Anti-tip brackets are metal devices designed to prevent freestanding ranges from tipping. They are normally attached to a rear leg of the range or screwed into the wall behind the range, and are included in all installation kits. A unit that is not equipped with these devices may tip over if enough weight is applied to its open door, such as that from a large Thanksgiving turkey, or even a small child. A falling range can crush, scald, or burn anyone caught beneath.2014-04-14 03.16.06

Bracket Inspection

Inspectors can confirm the presence of anti-tip brackets through the following methods:

  • It may be possible to see a wall-mounted bracket by looking over the rear of the range. Floor-mounted brackets are often hidden, although in some models with removable drawers, such as 30-inch electric ranges made by General Electric, the drawers can be removed and a flashlight can be used to search for the bracket. Inspectors should beware that a visual confirmation does not guarantee that the bracket has been properly installed.
  • Inspectors can firmly grip the upper-rear section of the range and tip the unit. If equipped with an anti-tip bracket, the unit will not tip more than several inches before coming to a halt. The range should be turned off, and all items should be removed from the stovetop before this action can be performed. It is usually easier to detect a bracket by tipping the range than through a visual search. This test can be performed on all models and it can confirm the functionality of a bracket.

If no anti-tip bracket is detected, inspectors should recommend that one be installed.

Clients can contact the dealer or builder who installed their range and request that they install a bracket. For clients who wish to install a bracket themselves, the part can be purchased at most hardware stores or ordered from a manufacturer. General Electric will send their customers an anti-tip bracket for free.

schedule

According to the U.S. Consumer Product Safety Commission (CPSC), there were 143 incidents caused by range tip-overs from 1980 to 2006. Of the 33 incidents that resulted in death, most of those victims were children. A small child may stand on an open range door in order to see what is cooking on the stovetop and accidentally cause the entire unit to fall on top of him, along with whatever hot items may have been cooking on the stovetop. The elderly, too, may be injured while using the range for support while cleaning. InterNACHI inspectors who inspect ovens should never leave the oven door open while the oven is unattended.

In response to this danger, the American National Standards Institute (ANSI) and Underwriters Laboratories (UL) created standards in 1991 that require all ranges manufactured after that year to be capable of remaining stable while supporting 250 pounds of weight on their open doors. Manufacturers’ instructions, too, require that anti-tip brackets provided be installed. Despite these warnings, retailer Sears estimated in 1999 that a mere 5% of the gas and electric units they sold were ever equipped with anti-tip brackets. As a result of Sears’ failure to comply with safety regulations, they were sued and subsequently required to secure ranges in nearly 4 million homes, a measure that has been speculated to have cost Sears as much as $500 million.

In summary, ranges are susceptible to tipping if they are not equipped with anti-tip brackets. Inspectors should know how to confirm that these safety devices are present.

From Anti-Tip Brackets for Freestanding Ranges – InterNACHI http://www.nachi.org/anti-tip.htm#ixzz2zXnoPcpx

Influenced by the changes in the economic and legal environments over the past 30 years, home inspection reports have changed to accommodate increased consumer expectations, and to provide more extensive information and protection to both inspectors and their clients.

Development of Standards

Prior to the mid-1970s, inspection reports followed no standard guidelines and, for the most part, there was little or no oversight or licensure. As might be imagined, without minimum standards to follow, the quality of inspection reports varied widely, and the home inspection industry was viewed with some suspicion.

Tablet Reporting System

Tablet Reporting System

With the founding of the American Society of Home Inspectors (ASHI) in 1976, home inspection guidelines governing inspection report content became available in the form of a Standards of Practice. Over time, a second, larger trade association, the International Association of Certified Home Inspectors (InterNACHI), came into existence, and developed its own standards.

InterNACHI has grown to dominate the inspection industry and, in addition to its Residential Standards of Practice, it has developed a comprehensive Standards of Practice for the Inspection of Commercial Properties.  Today, most types of inspections from mold to fire door inspections are performed in accordance with one of InterNACHI’s Standards of Practice.

As a consumer, you should take the time to examine the Standards of Practice followed by your inspector. If he is unaffiliated with any professional inspection organization, and his reports follow no particular standards, find another inspector.

Generally speaking, reports should describe the major home systems, their crucial components, and their operability, especially the ones in which failure can result in dangerous or expensive-to-correct conditions. Defects should be adequately described, and the report should include recommendations.

Reports should also disclaim portions of the home not inspected. Since home inspections are visual inspections, the parts of the home hidden behind floor, wall and ceiling coverings should be disclaimed.

Home inspectors are not experts in every system of the home, but are trained to recognize conditions that require a specialist inspection.

Home inspections are not technically exhaustive, so the inspector will not disassemble a furnace to examine the heat exchanger closely, for example.

Standards of Practice are designed to identify both the requirements of a home inspection and the limitations of an inspection.

Checklist and Narrative Reports

In the early years of the home inspection industry, home inspection reports consisted of a simple checklist, or a one- or two-page narrative report.

Checklist reports are just that; very little is actually written. The report is a series of boxes with short descriptions after them. Descriptions are often abbreviated, and might consist of only two or three words, such as “peeling paint.” The entire checklist might only be four or five pages long. Today, some inspection legal agreements are almost that long!

Because of the lack of detailed information, checklist reports leave a lot open to interpretation, so that buyers, sellers, agents, contractors, attorneys and judges may each interpret the information differently, depending on their motives.

In the inspection business, phrases that describe conditions found during an inspection are called “narratives.”  Narrative reports use reporting language that more completely describes each condition. Descriptions are not abbreviated.

Both checklist and narrative reports are still in use today, although many jurisdictions are now beginning to ban checklist reports because the limited information they offer has resulted in legal problems.

From the standpoint of liability, narrative reports are widely considered safer, since they provide more information and state it more clearly.

Many liability issues and problems with the inspection process are due to misunderstandings about what was to be included in the report, or about what the report says.

For example, in 2002, an investor bought a 14-unit hotel in California.  The six-page narrative report mentioned that flashing where the second-story concrete walkway met the building was improperly installed, and the condition could result in wood decay. Four years later, the investor paid out almost $100,000 to demolish and replace the entire upper walkway. In some places, it was possible to push a pencil through support beams.

Although the inspector’s report had mentioned the problem, it hadn’t made clear the seriousness of the condition, or the possible consequences of ignoring it. Today, a six-page report would be considered short for a small house.

Development of Reporting Software

Years ago, when computers were expensive to buy and difficult to operate, inspection reports were written by hand. As computers became simpler to operate and more affordable, inspection software began to appear on the market.

Today, using this software, an inspector can chose from a large number of organized boilerplate narratives that s/he can edit or add to in order to accommodate local conditions, since inspectors in a hot, humid city like Tampa Bay, Florida, are likely to find types of problems different from those found by inspectors in a cold, dry climate, like Salt Lake City, Utah.

Using narrative software and checking boxes in categories that represent the home systems, an inspector can produce a very detailed report in a relatively short time.

For example, using a checklist report, an inspector finding a number of inoperable lights in a home would check a box in the “INTERIOR” section labeled something like “some lights inoperable,” and that would be the limit of the information passed on to the client.

Using inspection software, in the “INTERIOR” section of the program, an inspector might check a box labeled “some lights inoperable.”  This would cause the following narrative to appear in the “INTERIOR” section of the inspection report:

“Some light fixtures in the home appeared to be inoperable. The bulbs may be burned out, or a problem may exist with the fixtures, wiring or switches.

If after the bulbs are replaced, these lights still fail to respond to the switch, this condition may represent a potential fire hazard, and the Inspector recommends that an evaluation and any necessary repairs be performed by a qualified electrical contractor.”

Standard disclaimers and other information can be pre-checked to automatically appear in each report.

Narrative Content

Narratives typically consists of three parts:

  1. a description of a condition of concern;
  2. a sentence or paragraph describing how serious the condition is, and the potential ramifications, answering questions such as, “Is it now stable, or will the problem continue?” or “Will it burn down the house?” and “When?”; and
  3. a recommendation. Recommendations may be for specific actions to be taken, or for further evaluation, but they should address problems in such a way that the reader of the report will understand how to proceed.

“Typically” is a key word here. Some narratives may simply give the ampacity of the main electrical disconnect. There is no need for more than one sentence. Different inspectors would include what they think is necessary.

Report Content

Inspection reports often begin with an informational section which gives general information about the home, such as the client’s name, the square footage, and the year the home was built.

Other information often listed outside the main body of the report, either near the beginning or near the end, are disclaimers, and sometimes a copy of the inspection agreement, and sometimes a copy of the Standards of Practice.  A page showing the inspector’s professional credentials, designations, affiliations and memberships is also often included.  And it is a good idea to include InterNACHI’s Now That You’ve Had a Home Inspectionbook.

Inspection reports often include a summary report listing major problems to ensure that important issues are not missed by the reader. It’s important that the reader be aware of safety issues or conditions which will be expensive to correct. With this in mind, some inspectors color-code report narratives, although many feel that color-coding exposes them to increased liability and don’t do this.

Software often gives inspectors the choice of including photographs in the main body of the report, near the narrative that describes them, or photographs may be grouped together toward the beginning or end of the report.

A table of contents is usually provided.

The main body of the report may be broken down into sections according to home systems, such as “ELECTRICAL,” “PLUMBING,” “HEATING,” etc., or it may be broken down by area of the home:  “EXTERIOR,” “INTERIOR,” “KITCHEN,” “BEDROOMS,” etc.

It often depends on how the inspector likes to work.

Sample Reports

Many inspectors have websites which include sample inspection reports for prospective clients to view. Take the time to look at them. Also often included is a page explaining the scope of the inspection. The inspection contract is usually included on the website, and it should give you a good idea of what will be included in the report.

In conclusion, for consumers to have realistic expectations about what information will be included in the home inspection report, follow these tips:

  • read the Standards of Practice;
  • read the Contract;
  • view a sample Inspection Report; and
  • talk with the inspector.

Article information by Nachi.org

Signature Home Inspection is a Certified Home Inspection service located in California serving Orange County, San Diego County, Los Angeles County, Riverside County, Santa Clara County, San Mateo County, San Francisco County, Contra Costa County, and San Bernardino County California.

www.signaturemore.com                                               888-860-2688

Inspecting Wood Shingle and Shake Roofs – Although asphalt shingles are the most commonly used roofing material in the United States, another type of roofing material the home inspector may encounter is wood shingles or wood shakes.

Wood shingles are sawn, lie flat on one another, and are thinner and more uniform than wood shakes.  Wood shakes are thicker

Wood Shingle Roof

Wood Shingle Roof

with an uneven surface and uneven thickness.  Shakes can be split on the face and have sawn backs (handsplit), split on both sides (straight-split and tapersplit), or sawn on both sides (tapersawn). Wood shakes can come in different sizes and shapes and surfaces.  The most common sizes for wood shakes are 18 inches and 24 inches in length.  All shakes are available in two grades (premium and No.1) and are graded to one face according to grain angle, flaws, and amount of heartwood/sapwood.

SHINGLES
Shingles are similar in appearance to tapersawn shakes except that they are thinner. Whereas the minimum butt-end thickness for tapersawn shakes is at least 5/8 inche, shingles have a butt-end thickness of about 3/8 to ½ of an inch. Shingles and shakes are usually cedar, but can also be made from Redwood.  The minimum slope for both wood shingles and shakes is 3:12 or greater.  The greater the slope, the longer they will last.

Wood shingles and shakes should be installed over solid or spaced plank sheathing.  Shakes are laid with a starter course under the first course of shakes at the roof’s edge with a 1 ½ inch overhang as a drip edge.  An inter-layment of roofing felt is laid between each course of shakes.  With shingles, the inter-layment is not used.  Shingles are laid from ¼ inch to 3/8 inch apart; shakes at 3/8 inch to 5/8 inch apart.  This spacing allows the shingles and shakes to expand when wet. If the proper spacing is not observed during installation, shingles and shakes can buckle, split, and cup when they expand.  Gaps between shingles and shakes should be staggered from course to course.  Each shingle and shake is fastened in place with 2 nails with minimum fastener penetration of ½ inch.

When inspecting the wood shingle or shake, always take the time to determine first whether or not you should walk on the roof.  Shingles and shakes that are wet, covered with moss, or mildew are very slippery. Do not walk on the roof if any of those conditions exist. If the shingles or shakes are badly deteriorated, you’ll break them if you walk on the roof. Avoid getting on the roof if the condition is bad.

If you do get on the roof, try to walk across the roof, not directly up and down from the eave to ridge. Be careful, as dry wood roofs in good condition can be tricky.  However, before mounting the roof, start inspecting the wood shingle or shake roof from the ground.  Looking at the roof from this low vantage point can help you spot areas that are excessively buckled or deteriorated.  If the weather is dry, you may notice some curling and shingles and shakes that have slightly lifted.  When it rains, they swell up and lay back down.

With a wood roof, the inspection of the roof from the attic is very important. The home inspector should be sure to check the type of roof sheathing and determine if it is appropriate. Remember, wood shingles and shakes should have solid or spaced sheathing.  Spaced sheathing allows the wood to dry out from both sides.

During the exterior inspection, the home inspector should inspect the condition of the wood shingle and shake roof for the following:

  • Improper Installation:  In dry weather, shingles should not be butted tight against each other and certainly not tight and buckled, split, and cupped.  Such shingles are laid without proper spacing. Note that gaps between shingles and shakes are staggered.  Check the overhang at the eaves.
  • Softness and rot: When the wood roof is not allowed to dry out, shingles and shakes can deteriorate.  In dry weather, you may see wood roofs that remain damp. Or you may see those where the butt ends are breaking up, splitting, and cracking.  The home inspector can probe for softness and deterioration. 
  • Damaged and weathered: Over time, sunlight can dehydrate shingles and shakes, causing them to become brittle and split and cup.  Wind-blown sand can erode the shingle and wear it down.  Watch for splits that lie directly under the gap in the course above making a pathway for water to enter the roof. Watch for damage that can occur from rubbing or falling tree branches.  You may also see evidence of someone else being on the roof.  There may be evidence of roof or gutter cleaners that wore shoes with spikes for traction that have left distinct holes on the roof.
  • Loose or missing: Look for any areas on the roof where the shingles are loose or missing.  If you come across loose or missing shingles or shakes, recommend a qualified roofer repair or replace the loose or missing shingles/shakes.
  • Moss and mildew: Moss present on the wood roof should be reported.  The most common cause of shingle and shake deterioration is the buildup of moss. If you see moss or algae, be careful, but you can probe these areas to see if there is any wood deterioration.  Also check the roof framing below mossy areas, as it can also be damaged from moss.  Moss should be removed from the roof, and there are chemical treatments available to kill moss.   There are also preservative treatments available that will retard the growth of moss.  If shingles and shakes are very dark or black, that is a sign of mildew.  Mildew can be scraped off but seldom without damaging the shingle itself. There are chemical treatments that can kill mildew.  Removal and suggestions on how to remove moss and mildew is best left to a qualified roofing contractor that is familiar with wood shingles/shakes.
  • Water penetration: The home inspector should inspect the wood roof carefully for water penetration.  Make note of rotted areas on the exterior and be sure to inspect the roof framing from the attic for any evidence of leaking

Perhaps the most difficult part of inspecting a wood roof is determining its remaining life.  A roof in good condition with a long life ahead of it and one that is in poor condition is both easy to identify. It is the in between ones that can be difficult.  It is a good idea to ask the home owner if they know the age of the roof.  A 10- year old roof in bad condition has serious problems and it is aging too fast. In general when about 15-20% of the roof requires repair, you should recommend a replacement soon. We suggest the homeowners have a sealant applied to the wood roofing-a water resistant stain that includes a mildecide and moss retarder.  This will help prolong the life of the roof.

Article information by AHIT and the USDA Forest

Signature Home Inspection is a Certified Home Inspection service located in California serving Orange County, San Diego County, Los Angeles County, Riverside County, Santa Clara County, San Mateo County, San Francisco County, Contra Costa County, and San Bernardino County California.

www.signaturemore.com                                               888-860-2688

Inspecting basement egress rescue openings – It should be no surprise that there are specific requirements for basement egress windows and rescue openings. As a

basement egress & rescue openings

Basement egress & rescue openings

home inspector, it is important to familiarize yourself with these requirements. Local regulations and codes vary across the country, so be sure to familiarize yourself with the requirements in your area to make yourself a more knowledgeable home inspector.

Not all basement rooms need a legal egress window.  Where basements contain one or more sleeping rooms, emergency egress and rescue openings are required in each sleeping room.  Remember, as home inspectors, safety is our number one priority for occupants, so corners should not be cut when inspecting this aspect of a basement.

Below are some important numbers and rules to keep in mind when inspecting basement bedrooms that have emergency escape and rescue opening(s).

Here is what the 2012 IRC Code states:

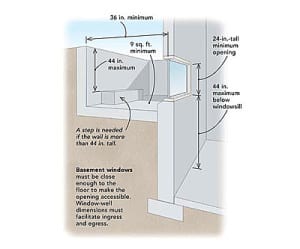
  • The maximum sill height, measured from the finished floor to the bottom of the clear opening is 44 inches.
  • The minimum opening area is 5.7 square feet (Exception is grade floor openings, which must have a minimum net clear opening of 5 square feet).
  • The minimum opening height is 24 inches.
  • The minimum opening width is 20 inches.
  • The minimum horizontal area of a window well is nine square feet, with a minimum horizontal projection and width of 36 inches. The area of the window well must allow the emergency escape and rescue opening to be fully opened.
  • Window wells shall be equipped with a permanently installed ladder or steps if the vertical depth of the window well is greater than 44 inches. The ladder or steps must be usable with the window fully open.
  • The ladder may project six inches into the required window well space.
  • Emergency escape and rescue openings need to be operational from the inside without the use of keys, tools or special knowledge.
  • Emergency escape windows under decks and porches are allowed as long as the deck allows the emergency escape window to be fully opened and provides a path not less than 36 inches in height to a yard or court.

Once again, local regulations and codes may vary from these IRC codes, so be sure to familiarize yourself with what is required in your area in order to properly inspect basement egresses and rescue openings.

Signature Home Inspection is a Certified Home Inspection service located in California serving Orange County, San Diego County, Los Angeles County, Riverside County, Santa Clara County, San Mateo County, San Francisco County, Contra Costa County, and San Bernardino County California.

www.signaturemore.com                                               888-860-2688

Water Heaters That Are Installed in Garages – You may live in an area of the country where the majority of water heaters are located in the garage. It is acceptable to have water heaters in the garage but there are some things that you

Water heater in garage

Water heater in garage

need to be aware of. The authority on determining what the requirements are for residential water heater installation and safety is the ICC (International Code Council). The following information is taken from the 2009 International Residential Code (IRC) section P2801.6 and P2803.6.1 commentary.

Water heaters having an ignition source shall be elevated so that the source of ignition is not less than 18” above the garage floor. An ignition source could be many things, including an open flame, electrical switch, open resistance heating coils, or an electrical igniter unit. Residential garages have a high potential for volatile liquids, such as gasoline and paint thinners that can spill or leak from their containers. Because the vapors from these liquids are heavier than air, they concentrate just above floor level, posing an explosion hazard in garages with a water heater.

Many electric water heater thermostats have enclosed contacts, but they are not sealed gas tight. Therefore, if an electric water heater with an ignition source located less than 18” from the bottom of the unit, it is required that the unit be elevated so the ignition source (thermostat) is at least 18” above the garage floor. Electric water heaters having all switching controls located above 18” from the bottom of the water heater are not required to be elevated.

Gas-fired appliances have to meet the elevation requirement for elevation above the garage floor, but have an exception to allow gas-fired appliances having flammable vapor ignition resistant (FVIR) design to be installed without elevating the unit.

Signature Home Inspection is a Certified Home Inspection service located in California serving Orange County, San Diego County, Los Angeles County, Riverside County, Santa Clara County, San Mateo County, San Francisco County, Contra Costa County, and San Bernardino County California.

www.signaturemore.com                                               888-860-2688
When inspecting an older home, the home inspector may come across the original old wiring and knob & tube wiring when the home was built.  A high number of electrical fires can occur in these older homes.  Having proper over-current protection can help prevent insulation failures, though in some cases time and exposure can take a toll on the wiring, and the wiring must be replaced.  Fuses were generally used in older homes to provide overcurrent protection but they had to be properly sized.  It was very common and very easy to bypass the proper protection byKnob & Tube Wiring using a let’s say a penny being used behind the fuse.

Insurance companies will typically require upgrading of older ceramic fuse panels and panels with cartridge fuses because of the risk of electrocution because of the exposed contacts.  Below are the references from the 2011 NEC

  • No exposed contact fuse holders
  • Edison base (plug fuses) cannot be used for 240V circuits
  • Type S fuse is required if tampering or over- fusing exists
  • Type S fuse adapter must be the proper size for the wire
  • Fuses are not allowed in the neutral conductor

The oldest wiring method in American residential homes is Knob and Tube wiring (K&T).  When K&T is left in its original state, it can be reliable and safe.  As a wiring method in un-insulated joists and stud cavities it is protected from damage and is provided with air circulation around the wires so heat does not build up.  Unfortunately, when these systems are modified by unqualified persons, the safety of K&T is often compromised. When people add new loads to an old system it is tricky and seldom done correctly. The rubber insulation on K&T wiring becomes brittle over time and is prone to mechanical damage, especially when thermal insulation is added to an attic. Older rubber insulation has only a rating of 60 degrees Celsius or 140 degrees Fahrenheit. Below are references from the 2011 NEC

  • No new K&T can be installed
  • Additions to existing K&T are permitted if properly protected
  • Must enter plastic boxes through separate holes
  • Must be protected with loom where entering box
  • Loom must extend from last insulator to ¼” inside box
  • Do not envelop with thermal insulation.
  • Wires must be kept out of direct contact with wood framing
  • Tubes are required where wires pass through framing members
  • 3” minimum between wires, 1” to surfaces
  • Conductors on sides (not face) of exposed joists and rafters EXC
      • Okay on edges or faces of rafters or joists in attics less than 3’ high
    • Protect with running boards up to 7’ high in attics with stairs
    • Provide protection were exposed less than 7’ above the floor

When inspectors encounter K&T wiring it is recommended that a qualified licensed electrical contractor/electrician evaluate the K&T wiring and repair/replace it as needed.

Information provided by the NEC 2011 Edition and the Complete Code Check Book

Signature Home Inspection is a Certified Home Inspection service located in California serving Orange County, San Diego County, Los Angeles County, Riverside County, Santa Clara County, San Mateo County, San Francisco County, Contra Costa County, and San Bernardino County California.

www.signaturemore.com                                               888-860-2688

According to The International Association of Certified Home Inspectors, more than 2 million decks are built and replaced each year in North America.

InterNACHI estimates that of the 45 million existing decks, ONLY 40% are completely safe.

One of the most common defects I see during Orange County deck inspection is wood-to-ground contact deck inspectioncausing rot and deterioration. Another deck defect that appears to be common with Orange County home inspection is improper attachment or anchoring to the home.

Because decks appear to be simple to build, many people do not realize that decks are, in fact, structures that need to be designed to adequately resist certain stresses. Middle to large size decks can also become really expensive to repair if they go neglected for several years.

Like any other house or building, a deck must be designed to support the weight of people, snow loads, and objects. A deck must be able to resist lateral and uplift loads that can act on the deck as a result of wind or seismic activity. Deck stairs must be safe and handrails graspable. And, finally, deck rails should be safe for children by having proper infill spacing.

If your buying an Orange County home than it’s important to know your new home, deck, detached garage, patio, etc.. is safe. Hiring a professional home inspector is your first step to ensuring your new home is safe and in move in condition.

A deck failure is any failure of a deck that could lead to injury, including rail failure, or total deck collapse. Rail failure occurs much more frequently than total deck collapses; however, because rail failures are less dramatic than total collapses and normally don’t result in death, injuries from rail failures are rarely reported.

Here are some interesting facts about deck failures provided by InterNachi:

  • More decks collapse in the summer than during the rest of the year combined.
  • Almost every deck collapse occurred while the decks were occupied or under a heavy snow load.
  • There is no correlation between deck failure and whether the deck was built with or without a building permit.
  • There is no correlation between deck failure and whether the deck was built by a homeowner or a professional contractor.
  • There is a slight correlation between deck failure and the age of the deck.
  • About 90% of deck collapses occurred as a result of the separation of the house and the deck ledger board, allowing the deck to swing away from the house. It is very rare for deck floor joists to break mid-span.
  • Many more injuries are the result of rail failure, rather than complete deck collapse.
  • Deck stairs are notorious for lacking graspable handrails.
  • Many do-it-yourself homeowners, and even contractors, don’t believe that rail infill spacing codes apply to decks.

A proper deck inspection relies heavily on the professional judgments of the inspector. Signature Home Inspection always provide quality deck assessments as part of our comprehensive infrared home inspection.

Why Are Home Inspections Important?

A home inspection is an all-encompassing examination of the condition of a home.   The home inspection process is often but not always performed at the time of the sale of the home. A home is one of the most important purchases one will ever make.  A home inspection is an inexpensive way to discover the universal condition of a home.  It is important to conduct a home inspection to avoid a costly mistake by purchasing a property in need of major repairs.  Even if you think you have found a “dream home,” it is a home inspector’s responsibility to let you know that your “dream home” may not be just right.
A certified home inspector is a professional who will conduct an inspection of the general condition of the home.  A good home inspection will assist a buyer in understanding exactly what they are about to acquire.  A home may look move in ready, but an inspector will cover features of the house such as electrical wiring, plumbing, roofing, insulation, as well as structural features of the home and may unveil issues that are not noticeable to the buyer’s eye.  As a buyer, you are making a vast investment, and it is important to understand exactly what you are purchasing.  Having a certified home inspector conduct a thorough inspection of the prospective property, could be compared to taking out an insurance policy against all potential operating costs.
There are many different types of home inspection processes that you may want to conduct before the purchase of a home.  First and most importantly, you would need a general or residential inspection performed on the home.  The certified home inspector would inspect the structure, exterior, roof, electrical, plumbing, HVAC, interior, insulation and ventilation.  Once the inspection is completed, the home inspector will generally provide the buyer with a report suggesting any improvements or repairs deemed necessary to bring the home up to current standards.  Home inspections may often reveal problems with a home that could be pricey to fix.  This could be used as a great tool in purchasing negotiations with the seller.  As the buyer you may be able to negotiate the price dependant on what the inspector has found.  If flaws were found within the home, the buyer now would have a couple more options in negotiations.  A buyer could negotiate a credit with the sellers, have the seller pay for repairs before the closing, purchase the home as is, or walk away from the purchase if the issues seem too problematic.
Other inspections that you may want before purchasing a home may be well water testing, oil tank testing and septic tank testing.  General home inspectors may be qualified to perform all of these tests and/or inspections for additional fees. It is important that you ask your potential inspector what his/her qualifications may be.
If at all possible, it is recommended to attend your home inspection process.  This is a valuable educational opportunity. Never pass up the chance to see your forthcoming home through the eyes of an expert.  The cost of a home inspection may vary depending upon the size, region, and age of the house.  A home inspection could take anywhere from 2-5 hours, again, depending upon the size and age of the home.  It is not an inspector’s responsibility to correct, or repair any potential issues found in the home.  An inspector may recommend repair, or to seek out skilled professionals in each trade for further information.
A home inspection will definitely give the buyer peace of mind and put the buyer’s mind at ease that the home is in good shape. It can also become a negotiation tool in closing, and could inform the buyer of potential future maintenance and upkeep.  A seller of a home may also request a home inspection before the home is put on the market.   This may assist the seller in setting a price, correct any issues with the home before it is put on the market, or merely having a pre-inspection report available for buyers informing them that the seller has nothing to hide.

How important is Proper Grade or Slope?

As we all know, water runs downhill. That being the case we must give it a path that will allow it to run away from the building or more specifically, away from the foundation. It really doesn’t matter if you have a crawl space, basement, or slab-on-grade foundation they all need proper drainage.
So, how do you tell if the slope/grade is correct? Over time and with experience you will be able to look and see if it is a positive (away from the building) or negative (towards the building) grade/slope. In the meantime, you can use either a 4-foot level or a ball bearing (at least 3/4″) to determine slope. Obviously, the ball bearing is only going to work on hard surfaces like walks, drives, and patios. The level is for grass, landscape materials, etc.
The rule of thumb is for the grade to slope away from the building at the rate of about 1- inch per foot for the first 6-feet. This is rarely the case in real life. We hope that it is at least flat and not negative. Look for signs of puddling water, erosion or settling of the soil near the foundation, and basement windows that are partially buried. All of these are probable indications of improper slope/grade.
Now, even if the grade is correct the water running off the roof can wreak havoc on the foundation as well. In homes with basements or areas with expansive soils, gutters should always be recommended to carry the water away from the foundation at least 4-6 feet. This will help tremendously with wet basements!
www.signaturemore.com

Amidst a wave of Chinese import scares, ranging from toxic toys to tainted pet food, reports of contaminated drywall from that country have been popping up across the American Southeast. Chinese companies use unrefined “fly ash,” a coal residue found in smokestacks in coal-fired power plants in their manufacturing process. Fly ash contains strontium sulfide, a toxic substance commonly found in fireworks. In hot and wet environments, this substance can off gas into hydrogen sulfide, carbon disulfide, and carbonyl sulfide and contaminate a home’s air supply.

The bulk of these incidents have been reported in Florida and other southern states, likely due to the high levels of heat and humidity in that region. Most of the affected homes were built during the housing boom between 2004 and 2007, especially in the wake of Hurricane Katrina when domestic building materials were in short supply. An estimated 250,000 tons of drywall were imported from China during that time period because it was cheap and plentiful. This material was used in the construction of approximately 100,000 homes in the United States, and many believe this has lead to serious health and property damage.

Although not believed to be life- threatening, exposure to high levels of airborne hydrogen sulfide and other sulfur compounds from contaminated drywall can result in the following physical ailments:

  • sore throat;
  • sinus irritation;
  • coughing;
  • wheezing;
  • headache;
  • dry or burning eyes; and/or
  • respiratory infections.
Due to this problem’s recent nature, there are currently no government or industry standards for inspecting contaminated drywall in homes. Professionals who have handled contaminated drywall in the past may know how to inspect for sulfur compounds but there are no agencies that offer certification in this form of inspection. Homeowners should beware of con artists attempting to make quick money off of this widespread scare by claiming to be licensed or certified drywall inspectors. InterNACHI has assembled the following tips that inspectors can use to identify if a home’s drywall is contaminated:
  • The house has a strong sulfur smell reminiscent of rotten eggs.
  • Exposed copper wiring appears dark and corroded. Silver jewelry and silverware can become similarly corroded and discolored after several months of exposure.
  • A manufacturer’s label on the back of the drywall can be used to link it with manufacturers that are known to have used contaminated materials. One way to look for this is to enter the attic and remove some of the insulation.
  • Drywall samples can be sent to a lab to be tested for dangerous levels of sulfur. This is the best testing method but also the most expensive.
Contaminated Chinese drywall cannot be repaired. Affected homeowners are being forced to either suffer bad health and failing appliances due to wire corrosion or replace the drywall entirely, a procedure which can cost tens of thousands of dollars. This contamination further reduces home values in a real estate environment already plagued by crisis. Some insurance companies are refusing to pay for drywall replacement and many of their clients are facing financial ruin. Class-action lawsuits have been filed against homebuilders, suppliers, and importers of contaminated Chinese drywall. Some large manufacturers named in these lawsuits are Knauf Plasterboard Tianjin, Knauf Gips, and Taishan Gypsum.
The Florida Department of Health recently tested drywall from three Chinese manufacturers and a domestic sample and published their findings. They found “a distinct difference in drywall that was manufactured in the United States and those that were manufactured in China.” The Chinese samples contained traces of strontium sulfide and emitted a sulfur odor when exposed to moisture and intense heat, while the American sample did not. The U.S. Consumer Safety Commission is currently performing similar tests. Other tests performed by Lennar, a builder that used Chinese drywall in 80 Florida homes, and Knauf Plasterboard, a manufacturer of the drywall, came to different conclusions than the Florida Department of Health. Both found safe levels of sulfur compounds in the samples that they tested. There is currently no scientific proof that Chinese drywall is responsible for the allegations against it.
Regardless of its source, contamination of some sort is damaging property and health in the southern U.S. The media, who have publicized the issue, almost unanimously report that the blame lies with imported Chinese drywall that contains corrosive sulfur compounds originating from ash produced by Chinese coal-fired power plants. Homes affected by this contamination can suffer serious damage to the metal parts of appliances and piping and lead, potentially leading to considerable health issues. While no governing body has issued regulations regarding contaminated drywall, it is advisable that home inspectors be aware of the danger it poses and learn how to identify it.