Knowing the approximate lifespan of your water heater is essential for a homeowner. Knowing when to replace it can help avoid the expense and stress of an unexpected breakdown. Various factors, including the type of unit, the quality of the installation, and the quality of maintenance, determine the lifespan of a water heater.

Gas Water Heater

Gas Water Heater

The most common types of water heaters are tankless and storage tanks. Tankless water heaters do not store hot water and use a heating element to heat the water on demand. Tankless water heaters are typically more energy efficient and have a longer lifespan than storage tank water heaters. Water heaters that are tankless usually last about 20 years.

Storage tank water heaters have a tank that stores a certain amount of hot water and use a heating element to keep the tank full. These water heaters are typically less energy efficient than tankless water heaters and have a shorter lifespan. The average lifespan of a storage-tank water heater is 8-12 years.

The quality of the installation is also a factor in determining the water heater’s lifespan. Poorly installed or incorrectly sized water heaters can cause problems such as leaks or even explosions. To ensure that your water heater is installed correctly, hiring a professional experienced with it is essential.

Maintenance is also crucial for extending the lifespan of a water heater. Regular maintenance, such as flushing the tank, checking for leaks, and replacing damaged parts, can help keep your water heater in good condition and prevent problems. Replacing the anode rod every few years can also help extend the water heater’s life.

Overall, the estimated lifespan of a water heater varies depending on the unit type, the installation quality, and the maintenance quality. Tankless water heaters typically last about 20 years, and storage tank water heaters last 8-12 years. To ensure that your water heater is in good condition, it is essential to hire a professional for installation and perform regular maintenance.

Maintaining a water softener ensures that your home has the best water quality. Whether you are looking to protect your home’s plumbing system, reduce your water bills, or improve the taste of your tap water, a water softener can help. But, like any appliance, your water softener will require regular maintenance to ensure it functions correctly. In this article, we will discuss tips on maintaining your water softener.
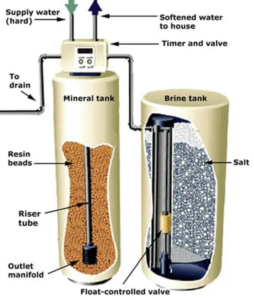
Water Softener

Water Softener

Firstly, check the salt levels in your water softener. Most water softeners use salt to remove the minerals that cause hard water. Over time, the salt levels will decrease, and you will need to refill them. Look for the “salt level” indicator on your water softener and make sure it is complete. If not, use a scoop to fill it with salt. Do this at least once every six months or when the indicator indicates it is low.

Secondly, make sure your water softener is set correctly. You can do this by checking the settings on the control valve. The settings will vary depending on the type of softener you have. Look for the “grain setting” and ensure it is appropriate for your water. If you are unsure, consult the manufacturer’s manual for specific instructions.

Thirdly, regularly clean your water softener. Remove any dirt, debris, or sediment that has built up, and rinse out any accumulated salt. This will help keep the system running smoothly and prevent any potential damage. You should clean your water softener at least once every 3-5 years.

Finally, check the pressure of your water softener. The pressure of your water softener should remain consistent, so make sure it is not fluctuating. If it is, you may need to adjust the pressure settings on the control valve.

By following these simple tips for water softener maintenance, you can ensure your home has the best water quality possible. Remember these tips; you should have no problem maintaining your water softener.

How to clean your washer and dryer is an essential part of home maintenance that helps keep your appliances running smoothly and efficiently. The process is simple and only requires a few items and steps to ensure your washer and dryer are sparkling clean.

How to clean your washer and dryer

How to clean your washer and dryer

The first step is removing lint or other debris from the lint traps. This should be done regularly, as lint can clog the vents and reduce the efficiency of the machines. Next, use a dry, soft cloth to wipe down the lint traps and the exterior of the machines. This will help to remove any dust and grime that has built up over time.

Once the exterior is clean, it’s time to clean the inside of the washer and dryer. You’ll need a small amount of mild detergent and some white vinegar to do this. Mix the detergent and vinegar to form a soapy solution, and then use a soft cloth to wipe down the inside of the washer and dryer. Be sure to pay special attention to the seals and gaskets, as these are often missed when cleaning.

Once the inside has been cleaned, it’s time to clean the filter and drain system. This should be done once every few months to ensure that any lint or debris accumulating doesn’t clog the system and reduce efficiency. To do this, remove the filter and place it in a sink filled with the soapy solution you made earlier. Let it soak for about 20 minutes, then rinse with warm water. The drain system can be cleaned with the same method.

Finally, use a soft cloth to shine up all metal surfaces, like the knobs and control panel. This will help to keep the washer and dryer looking good and running smoothly.

Cleaning your washer and dryer is an essential part of home maintenance. With just a few supplies and steps, your washer and dryer can be sparkling clean and ready to use. Regular cleaning and maintenance will help your appliances run more efficiently and last longer.