Taking air samples during a mold inspection is important for several reasons.  Mold spores are not visible to the naked eye, and the types of mold present can often be determined through laboratory analysis of the air samples.  Having samples analyzed can also help provide evidence of the scope and severity of a mold problem, as well as aid in assessing human exposure to mold spores.  After remediation, new samples are typically taken to help ensure that all mold has been successfully removed.

Air samples can be used to gather data about mold spores present in the interior of a house.  These samples are taken byAir Sampling for Mold Inspections using a pump that forces air through a collection device which catches mold spores.  The sample is then sent off to a laboratory to be analyzed.  InterNACHI inspectors who perform mold inspections often utilize air sampling to collect data, which has become commonplace.

Air-Sampling Devices

There are several types of devices used to collect air samples that can be analyzed for mold.  Some common examples include:

  • impaction samplers that use a calibrated air pump to impact spores onto a prepared microscope slide;
  • cassette samplers, which may be of the disposable or one-time-use type, and also employ forced air to impact spores onto a collection media; and
  • airborne-particle collectors that trap spores directly on a culture dish.  These may be utilized to identify the species of mold that has been found.

When and When Not to Sample

Samples are generally best taken if visual, non-invasive examination reveals apparent mold growth or conditions that could lead to growth, such as moisture intrusion or water damage.  Musty odors can also be a sign of mold growth.  If no sign of mold or potential for mold is apparent, one or two indoor air samples can still be taken, at the discretion of the inspector and client, in the most lived-in room of the house and at the HVAC unit.

Outdoor air samples are also typically taken as a control for comparison to indoor samples.  Two samples — one from the windward side and one from the leeward side of the house — will help provide a more complete picture of what is in the air that may be entering the house through windows and doors at times when they are open.  It is best to take the outdoor samples as close together in time as possible to the indoor samples that they will be compared with.

InterNACHI inspectors should avoid taking samples if a resident of the house is under a physician’s care for mold exposure, if there is litigation in progress related to mold on the premises, or if the inspector’s health or safety could be compromised in obtaining the sample.  Residential home inspectors also should not take samples in a commercial or public building.

MoldSafe

Where to Sample and Ideal Conditions

In any areas of a house suspected or confirmed to have mold growth, air samples can be taken to help verify and gather more information.  Moisture intrusion, water damage, musty odors, apparent mold growth, or conditions conducive to mold growth are all common reasons to gather an air sample.  Samples should be taken near the center of the room, with the collection device positioned 3 to 6 feet off the ground.

Ten minutes is an adequate amount of time for the air pump to run while taking samples, but this can be reduced to around five minutes if there is a concern that air movement from a lot of indoor activity could alter the results.  The sampling time can be reduced further if there is an active source of dust, such as from ongoing construction.

Sampling should take place in livable spaces within the house under closed conditions in order to help stabilize the air and allow for reproducibility of the sampling and measurement.  While the sample is being collected, windows and exterior doors should be kept shut other than for normal entry and exit from the home.  It is best to have air exchangers (other than a furnace) or fans that exchange indoor-outdoor air switched off during sampling.

Weather conditions can be an important factor in gathering accurate data. Severe thunderstorms or unusually high winds can affect the sampling and analysis results.  High winds or rapid changes in barometric pressure increase the difference in air pressure between the interior and exterior, which can increase the variability of airborne mold-spore concentration.  Large differences in air pressure between the interior and exterior can cause more airborne spores to be sucked inside, skewing the results of the sample.

Difficulties and Practicality of Air Sampling

It is helpful to think of air sampling as just one tool in the tool belt when inspecting a house for mold problems.  An air sample alone is not enough to confirm or refute the existence of a problem, and such testing needs to be accompanied by visual inspection and other methods of data collection, such as a surface sample.  Indoor airborne spore levels can vary according to several factors, and this can lead to skewed results if care is not taken to set up the sampling correctly.  Also, since only spores are collected with an air sample and may actually be damaged during collection, identification of the mold type can be more difficult than with a sample collected with tape or a cultured sample.

Air samples are good for use as a background screen to ensure that there isn’t a large source of mold not yet found somewhere in a home.  This is because they can detect long chains of spores that are still intact.  These chains normally break apart quickly as they travel through the air, so a sample that reveals intact chains can indicate that there is mold nearby, possibly undiscovered during other tests and visual examination.

In summary, when taken under controlled conditions and properly analyzed, air samples for mold are helpful in comparing relative particle levels between a problem and a control area.  They can also be crucial for comparing particle levels and air quality in an area before and after mold remediation.

From Air Sampling for Mold Inspections – InterNACHI http://www.nachi.org/air-sampling-mold-inspection.htm#ixzz366bRe0Kr

A hot water recirculation system is a plumbing system that moves hot water to fixtures quickly without waiting for the water to get hot. Rather than relying on low water pressure, common in most water lines, recirculating systems rapidly move water from a water heater to the fixtures.
System Types 
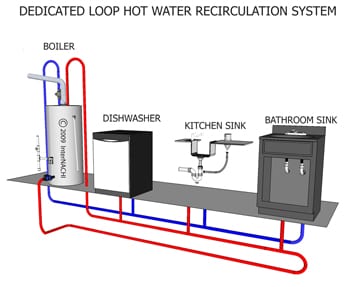
  • dedicated loop:  The circulation pump for this system is mounted on a pipe connected to the water heater tank down low. This is the cooler side of the loop, or the return.
    The hot water pipe is installed in a loop throughout the home, passing near each plumbing fixture. At each fixture, a short pipe connects the loop to the hot water valve. Because hot water is constantly circulating through the hot water loop, any time a valve is opened, it takes only a fraction of a second for hot water to reach the valve.
This helps extend the lifespan of the pump. If the home is not occupied, this pump will be probably be unplugged because the seller doesn’t want to pay for its operation in an empty house.
  • integrated loop:  This system is typically used on retrofits but may also be installed on new construction. It consists of a pump installed under the plumbing fixture farthest from the water heater. The pump contains a sensor which switches the pump on when water temperature drops below 85° F, and switches it off when water temperature reaches 95° F. Newer pumps are adjustable from 77° to 104° F.In this system, hot water is re-circulated intermittently. Hot water is returned to the water heater via the cold water pipes. This raises the temperature of the cold water slightly, but it returns to the usual cold temperature in a short time.

Activation

Hot water recirculation systems are most commonly activated by either a thermostat or a timer. Systems that use a thermostat or timer automatically turn the pump on whenever the water temperature drops below a set point, or when the timer reaches a certain setting. These systems ensure that hot water is always available at the faucet.

Do they really save energy and water?

Regardless of whether they are controlled manually or automatically, recirculation systems reduce the amount of water that goes down the drain while the homeowner waits for the desired temperature. This fact allows for the following three advantages over conventional water distribution systems:hot water recirculation systems

  • They save time. Recirculating systems deliver hot water to faucets quickly, adding convenience for the homeowner.
  • They conserve water. According to statistics from the U.S. Department of Energy and the U.S. Census Bureau, between 400 billion and 1.3 trillion gallons of water (or close to 2 million Olympic-sized swimming pools) are wasted nationally by households per year while waiting for water to heat up.
  • They limit municipal energy waste. The DOE estimates that 800 to 1,600 kilowatt-hours per year are used to treat and pump the water to households that will eventually be wasted while the occupant waits for tap water to warm to the desired temperature.

If recirculation systems pump continuously, however, they have the potential to use significantly more energy. For a modest-sized pump, this might be 400 to 800 KWH a year if the pump runs all the time. Also, heat loss from the pipes can be significant if the hot water pipes are poorly insulated. This will result in the hot water heater running more. This added heat may be a benefit in the winter, but heat loss may add heat to the house in the summer and may result in higher bills for use of air conditioning.

Rebates

Some jurisdictions, particularly in areas where water is scarce, offer rebates on the purchase and installation of hot water recirculation systems. The cities of Santa Fe and Albuquerque, New Mexico, for instance, offer a $100 rebate for homeowners who purchase a hot water recirculation system. The city of Scottsdale, Arizona, offers up to $200 for residential property owners who install theses systems, although they must comply with UL-product and installation standards. Some systems may not comply with efficiency standards set by these municipalities.

Availability and Cost

Hot water recirculation systems are available nationwide from manufacturers, distributors, plumbing wholesale supply warehouses, and at selected retail home stores. The initial cost of dedicated systems may prevent some homeowners from installing these systems, as they require the purchase and installation of a pump and a large amount of piping. Integrated systems, by contrast, require only a pump and fittings. Energy savings will vary, depending on the design of the plumbing system, method of control and operation, and homeowner use. The system is easily installed and costs less than $400.

Inspection Considerations

These systems all require an in-line air valve and shut-off valve. Other requirements will vary with the installation’s configuration, but may include a check valve and an additional shut-off valve.  The pump may be connected to a sensor with high and low temperature limits so that the pump circulates water through the loop only when the sensor calls for it.

Inspections should be limited to the system’s proper operation.

In summary, hot water redistribution systems are innovative plumbing systems that can save water and energy in certain circumstances.
Note:  The terms “dedicated” and “integrated” are descriptive terms invented for the purposes of this article. No universal, suitable terms were found to describe these system types during research.


From Hot Water Recirculation Systems – InterNACHI http://www.nachi.org/hot-water-recirculation-systems.htm#ixzz34y8GNbkD

Radiant heating systems directly heat the floor or panels in the wall or ceiling of a house, rather than heating the air, as do forced-air heating systems. The technique can be likened to standing in full sun on a chilly day, or feeling the warmth of a distant bonfire even though the air is cold. Despite their name, radiant heating systems also depend on convection — the natural circulation of heat within a room — caused by heat rising from the floor.

Radiant heat has been used since ancient times, perhaps as far back as 4000 BC in Mongolia. The ancient Romans, too, made useRadiant Heating Systems of a type of radiant heating known as a hypocaust to heat their houses and public baths. Recent decades have seen more mainstream use of radiant heating in Europe, although it is finally gaining popularity in the United States, especially in new-home construction, where installation is more economical. While European inspectors have far more experience with these systems, American and Canadian inspectors should be prepared to encounter them with increasing frequency.

Radiant heating systems use one of two heating mediums, each of which is described below:
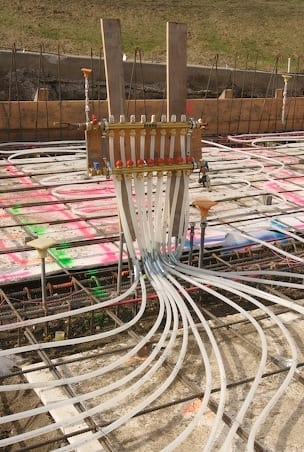
  • water (hydronic) radiant heat: This system uses hot water carried by tubing, arranged in a grid, to heat the home.
  • electric radiant floors: This system uses electricity carried by cables or floor mats to heat the home.

An installation of a radiant floor heating systems is either wet or dry (not to be confused with the aforementioned distinctions), and the decision to use one or the other is largely based on whether the system will be installed in new or existing construction. These two methods are briefly summarized as follows:

  • In a wet installation, the heating panels are installed on the floor, and a thin layer of concrete or gypsum is spread over the installation, sandwiching the cables or tubing between two layers of flooring or concrete. This installation is ideal in new-home construction, where a concrete slab, which has high thermal mass, is used to build the ground floor.
  • Radiant floor dry installations are relatively new strategies in which the cables or tubing run in an air space beneath the floor. Tubing is often sandwiched between layers of plywood or beneath the subfloor. Dry heating is more common in retrofits and when the floors in new homes are not poured concrete.

Advantages of Radiant Heating

  • efficiency. Radiant heating systems use less energy than convective heating systems where the same fuel is being used. This is due to a number of reasons:
    • The thermostat can be set to a lower temperature and still afford the same comfort. Rooms heated by radiance are typically heated uniformly from floor and ceiling, in contrast with forced-air systems, which leave the floors cold. Studies conducted by the American Society of Heating, Refrigeration and Air Conditioning Engineers (ASHRAE) indicate that people can be as comfortable at temperatures 6 to 8 degrees lower with radiant heating than with convective heating that uses air as the primary heat-transfer medium.
    • They require no ducts or pipes, which account for heat losses in other systems.
    • There is less heat loss through windows because air is not being blown.
    • Radiant heaters can be zoned so that energy is only used to heat individual rooms. You can thus more easily direct heat to areas that are more trafficked or chillier, while directing heat away from rooms that see little use.
  • Radiant heating systems, unlike forced-air systems, pose little threat of spreading dust, pollen and germs.
  • flexible fuel choices. Hydronic systems can be heated with a wide variety of energy sources, such as solar water heaters or gas, wood or oil-fired boilers.
  • unobtrusive. Radiant heating systems are not visible in the occupied space, which saves floor space and allows for more decorative freedom.
  • quiet and clean. Radiant heating systems are quiet, clean and require little or no maintenance. An oil-fired heating boiler, on the other hand, requires annual maintenance.
  • Radiant heaters take a long time to cool. This can be beneficial in several ways:
    • The heater can be run at night during off-peak hours when electricity rates are cheaper. It can then be turned off, yet still radiate heat, during peak hours.
    • As it takes a long time for radiant heaters to cool down, they will continue to provide heat for hours into a blackout.

Disadvantages of Radiant Heating

  • Additional under-slab insulation is required for radiant heating systems mounted on the ceiling.
  • limited choice of floor covering. Carpet, due to its properties as a thermal insulator, reduces efficiency of in-floor systems. Wood, too, may not be a good choice because of its tendency to crack or shrink when heated. If wood must be used, it is best to use wood with a low moisture level to avoid shrinking and gaps.
  • potentially high utility costs. In some areas, electricity is the most expensive way to provide heat.
  • high up-front cost. Due to their complex installation, up-front costs can be prohibitive.
  • long warm-up period. Electric systems heat up faster than liquid systems, although both take longer than conventional forced-air systems.
  • They can only be used to heat. Separate systems are required to provide cooling, air cleaning and ventilation. A forced-air system, by contrast, can do all of these things.
  • Maintenance and repair of pipes may be difficult due to their lack of accessibility.
In summary, radiant heating is an attractive alternative to conventional heating systems, although neither system is perfect.

From Radiant Heating Systems – InterNACHI http://www.nachi.org/radiant-heating-systems.htm#ixzz34XDlAaG9

Solar energy offers considerable advantages over conventional energy systems by nullifying flaws in those systems long considered to be unchangeable. Solar power for home energy production has its flaws, too, which are outlined in another article, but they’re dwarfed by the advantages listed below.

The following are advantages of solar energy:

  • Raw materials are renewable and unlimited. The amount of available solar energy is staggering — roughly 10,000 times that currently required by humans — and it’s constantly replaced. A mere 0.02% of incoming sunlight, if captured correctly, would be sufficient to replace every other fuel source currently used.advantages of solar energy Granted, the Earth does need much of this solar energy to drive its weather, so let’s look only at the unused portion of sunlight that is reflected back into space, known as the albedo. Earth’s average albedo is around 30%, meaning that roughly 52 petawatts of energy is reflected by the Earth and lost into space every year. Compare this number with global energy-consumption statistics.  Annually, the energy lost to space is the combined equivalent of 400 hurricanes, 1 million Hoover Dams, Great Britain’s energy requirement for 250,000 years, worldwide oil, gas and coal production for 387 years, 75 million cars, and 50 million 747s running perpetually for one year (not to mention 1 million fictional DeLorean time machines!).
  • Solar power is low-emission. Solar panels produce no pollution, although they impose environmental costs through manufacture and construction. These environmental tolls are negligible, however, when compared with the damage inflicted by conventional energy sources:  the burning of fossil fuels releases roughly 21.3 billion metric tons of carbon dioxide into the atmosphere annually.
  • Solar power is suitable for remote areas that are not connected to energy grids. It may come as a surprise to city-dwellers but, according to Home Power Magazine, as of 2006, 180,000 houses in the United States were off-grid, and that figure is likely considerably higher today. California, Colorado, Maine, Oregon, Vermont and Washington have long been refuges for such energy rebels, though people live off the grid in every state. While many of these people shun the grid on principle, owing to politics and environmental concerns, few of the world’s 1.8 billion off-the-gridders have any choice in the matter. Solar energy can drastically improve the quality of life for millions of people who live in the dark, especially in places such as Sub-Saharan Africa, where as many as 90% of the rural population lacks access to electricity. People in these areas must rely on fuel-based lighting, which inflicts significant social and environmental costs, from jeopardized health through contamination of indoor air, to limited overall productivity.

Schedule Inspection

  • Solar power provides green jobs. Production of solar panels for domestic use is becoming a growing source of employment in research, manufacture, sales and installation.
  • Solar panels contain no moving parts and thus produce no noise. Wind turbines, by contrast, require noisy gearboxes and blades.
  • In the long run, solar power is economical. Solar panels and installation involve high initial expenses, but this cost is soon offset by savings on energy bills.  Eventually, they may even produce a profit on their use.
  • Solar power takes advantage of net metering, which is the practice of crediting homeowners for electricity they produce and return to the power grid. As part of the Energy Policy Act of 2005, public electric utilities are required to make available, upon request, net metering to their customers. This practice offers an advantage for homeowners who use solar panels (or wind turbines or fuel cells) that may, at times, produce more energy than their homes require. If net metering is not an option, excess energy may be stored in batteries.
  • Solar power can mean government tax credits. U.S. federal subsidies credit up to 30% of system costs, and each state offers its own incentives. California, blessed with abundant sunshine and plagued by high electric rates and an over-taxed grid, was the first state to offer generous renewable-energy incentives for homes and businesses.
  • Solar power is reliable. Many homeowners favor solar energy because it is virtually immune to potential failings of utility companies, mainly in the form of political or economic turmoil, terrorism, natural disasters, or brownouts due to overuse. The Northeast Blackout of 2003 unplugged 55 million people across two countries, while rolling blackouts are a part of regular life in some South Asian countries, and occasionally in California and Texas.
  • Solar power conserves foreign energy expenditures. In many countries, a large percentage of earnings is used to pay for imported oil for power generation. The United States alone spends $13 million per hour on oil, much of which comes from Persian Gulf nations. As oil supplies dwindle and prices rise in this politically unstable region, these problems continue to catalyze the expansion of solar power and other alternative-energy systems.
In summary, solar energy offers advantages to conventional fossil fuels and other renewable energy systems.

From Advantages of Solar Energy – InterNACHI http://www.nachi.org/advantages-solar-energy.htm#ixzz34RmAv9Yd

Vinyl siding is the form of exterior cladding that home inspectors are likely to encounter most frequently.  Homeowners, remodeling contractors and builders often choose vinyl siding as an alternative to wood and aluminum because it is attractive, durable, easy to maintain and cost-effective.  Vinyl siding is often textured to resemble wood or stone in a variety of colors.
Although it is a very popular and well-regarded product, homeowners may want to be aware of some of the downsides of using vinyl siding if they are thinking about remodeling or building a new home.  InterNACHI inspectors will likely examine many homes with vinyl siding and can benefit from knowing more about this most common type of exterior cladding, including what to look for during an inspection.
Schedule Inspection

History and Manufacturing

Vinyl siding came into use as an exterior cladding in the late 1950s and has grown steadily in popularity since its introduction, covering billions of square feet of exterior walls.  Vinyl siding is made with PVC (polyvinyl chloride).  In the beginning, vinyl siding was manufactured only by the process of mono-extrusion, whereby the elements of the PVC compound formed a single-layer product.  Initial methods of manufacturing lead to difficulty producing a consistently high-quality product, but they have since been corrected.  Vinyl siding is now typically manufactured using a co-extrusion process, which creates a product with two layers.  The outer layer contains pigment which adds color to the siding and resists breakdown from UV light.  The under-layer is its substrate.  Vinyl siding produced today is of a reliably higher quality than that produced years ago, which has led to it becoming the most common choice for exterior cladding.

Pros and Cons

Vinyl siding can provide advantages over other exterior cladding materials, but there are also some concerns to be aware of.  Here are some pros and cons related to its specific attributes and characteristics.

Advantages:

  • Vinyl siding is very durable.
  • It will last a long time when properly maintained.
  • It will not fade.
  • It will not rust.
  • It does not dent easily.
  • Vinyl siding provides a supplemental rain screen.
  • It is designated as a water-resistant barrier.  Properly installed vinyl siding is designed to let the material underneath it breathe.
  • As long as the siding has been properly installed, maintenance is very simple, limited mostly to spray-washing once a year or whenever necessary.

Disadvantages:

  • In extreme weather conditions, vinyl siding is as susceptible to damage as any other siding.
    • In severe cold, vinyl siding can become brittle and more susceptible to cracking if something impacts it.
    • Extreme heat can also cause vinyl to melt or distort.  There have been cases reported of extremely hot reflections from nearby windows causing warping and melting.
  • Vinyl siding is not a form of insulation.  It is simply an exterior cladding, but some salespeople misrepresent this fact with claims that new siding will aid energy efficiency.  This is only applicable for siding that includes special insulating inserts or backings, but not to the vinyl siding itself.
  • Vinyl siding is not a watertight covering.
  • If a fire occurs, vinyl siding will melt or burn and may release toxic chemicals, making the situation more dangerous for occupants.  Some groups believe PVC itself can have a negative impact on health and there is much debate about these claims.
  • Problems can occur if incorrect installation is allowing water to become trapped behind the siding, which would need to be addressed before water damage becomes an issue.
  • In areas with a high concentration of historic buildings, the use of vinyl siding may be a controversial choice because of concerns regarding how its aesthetics may impact historical preservation and property values.
Evidence has been presented that the production of vinyl may be hazardous to those in close proximity to production facilities.
Recycling of vinyl siding is currently limited to unused scraps and pieces that have never been installed.

Tips for Inspecting Vinyl Siding

Some of these details may be observed while inspecting the exterior of a house, depending on whether the vinyl siding has already been installed or is in the process of being installed:

  • Ripples in the siding can result from stapling or nailing through the face of the siding, which is an incorrect installation.
  • Caulk is not necessary in spots where panels meet the receiver of inside corners, outside corners or J-trim.  Caulk is also not needed at overlap joints.
  • Normal expansion and retraction of the vinyl requires at least ¼-inch of clearance at all openings and stops.
  • Distortion and buckling of panels may be caused by fasteners that were not driven straight and level.

Vinyl Siding

  • Correct installation requires that fastener heads not be driven too tightly against the siding’s nail hem, but should leave about 1/32-inch of clearance between the fastener head and siding panel.  This is about equal to the thickness of a dime.
  • For a proper hold, fasteners are best driven at least ¾-inch into a surface meant to accept nails, such as substantial sheathing or furring strips.  A ½-inch gap should be left between nailing strips where two pieces overlap.
  • Fasteners installed properly will be in the center of the nailing slot.
  • Properly installed panels and accessories should move freely from side to side.
  • Since wind-driven rain can easily get into the space behind the siding, building paper or housewrap should be installed behind the siding to protect against water damage.  Drainage holes or slots in horizontal vinyl siding allow water behind the siding to drain.
  • It is best for lap joints to be staggered and not lined up vertically.
  • When properly installed, surface-mounted fixtures, such as exterior lights, should not be mounted directly to vinyl siding.  They should be mounted on mounting blocks instead, since fasteners penetrating the siding will restrict the siding’s natural expansion and contraction, causing problems.
  • Corrosion-resistant fasteners are always best for any outdoor installation.
  • When properly installed, vinyl siding will terminate in J-molding around windows and doors.
While vinyl siding has become extremely popular due to the advantages it provides, in some instances, such as when historic preservation is of primary concern, it may not be the best choice.  InterNACHI inspectors who know more about vinyl siding will be well-prepared to answer clients’ questions.  In general, proper installation is the main concern with this type of exterior cladding.  When correctly installed and maintained, vinyl siding is attractive and durable, and can last for many years.

From Vinyl Siding Inspection – InterNACHI http://www.nachi.org/vinyl-siding-inspection.htm#ixzz34Lgcacmu