Why Mold Inspection is Crucial for California Homebuyers
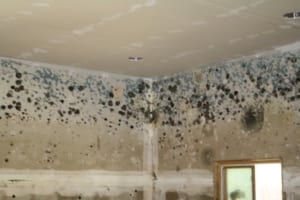
Buying a home in California? A professional mold inspection should be a top priority. Mold can cause severe respiratory issues, allergies, and long-term health problems, making it critical to detect it before finalizing your purchase. Understanding mold inspection costs helps you budget effectively and ensures a safe living environment.
Mold Inspection
How Much Does a Mold Inspection Cost in California?
The average mold inspection cost in California ranges from $400 to $1,000, depending on several factors:
-
Home Size – Larger homes require more time and testing, increasing costs.
-
Type of Inspection – Basic visual inspections are less expensive, while advanced tests (such as air sampling and moisture mapping) cost more.
-
Location – Prices may vary between urban (Los Angeles, San Francisco) and rural areas.
-
Specialized Services – If hidden mold is suspected, infrared cameras or laboratory testing may be required, which can add to the expense.
Additional Costs to Consider
-
Mold Testing (Lab Analysis) – $150–$500
-
Complete Mold Remediation (if needed) – $1,500–$6,000+
How to Save Money on Mold Inspections
-
Compare Multiple Quotes – Get estimates from certified mold inspectors to find the best deal.
-
Check for Discounts – Some companies offer promotions for first-time homebuyers.
-
Ask About Warranties – Some California homes come with a mold warranty, which may cover the costs of inspections.
-
Bundle Services – If you’re also getting a home inspection, ask if mold testing can be added at a discount.
Choosing the Right Mold Inspector
Not all inspectors are equal. Look for:
-
Certifications (IICRC, ACAC, or state-licensed)
-
Positive Reviews (Check Yelp, Google, and BBB)
-
Detailed Reports (Including lab results, if applicable)
Does Home Insurance Cover Mold Inspections?
Most standard homeowners’ insurance policies do not cover mold inspections unless the mold results from a covered peril (like water damage from a burst pipe). However, some specialized mold warranties may offer protection; always verify with the seller.
Final Tips for California Homebuyers
✅ Inspect Before Buying – Avoid costly surprises by testing for mold early.
✅ Negotiate with Sellers – If mold is found, request remediation or a price reduction.
✅ Prevent Future Mold – Ensure proper ventilation, promptly fix leaks, and control humidity.
Need a Professional Mold Inspection in Orange County?
Signature Home Inspection in Irvine, CA, offers certified mold inspections with detailed, accurate reports. Serving Irvine, Newport Beach, Costa Mesa, and the entire Orange County area, our experts utilize advanced tools to detect hidden mold and safeguard your investment.
📞 Call 888-860-2688 Today for a Quote!