A home inspection is an integral part of the home-buying process, as it allows homebuyers to identify any potential problems before purchasing the home. Home inspections can be costly, so it is essential to know what to expect when it comes to home inspection costs in Orange County, California. How much does a home inspection cost in Orange County, California?

How much does a home inspection cost in Orange County California?

How much does a home inspection cost in Orange County, California?

When it comes to home inspections, several factors can affect the cost. The home’s size, the home inspection’s complexity, the type of systems and features included, and the home inspector’s experience are all essential considerations when it comes to the cost of a home inspection.

In Orange County, California, the average cost for a home inspection is between $300 and $600. This cost typically includes the inspection itself and any follow-up questions the home inspector may have. Some home inspectors may charge more for additional services, such as radon testing or a mold inspection.

The home inspection cost can also be affected by the home’s location. Homes in more rural areas may be more expensive to inspect due to the distance the home inspector must travel to the property. Homes in more urban areas may be more costly to inspect due to the complexity of the systems and features that must be inspected.

In addition to the home inspection cost, homebuyers should also factor in other costs associated with the home purchase. These can include closing costs, repairs that may be needed after the inspection, and any additional fees associated with the home purchase.

Overall, the cost of a home inspection in Orange County, California, can vary depending on the home’s size, the inspection’s complexity, and the home inspector’s experience. Homebuyers should factor in these costs when budgeting for their home purchase. On average, a basic home inspection can cost anywhere from $300 to $600 in Orange County. However, additional mold, termite, or pool inspections may incur additional costs. It is recommended to contact multiple inspection companies in the area to get accurate quotes and compare prices.

When buying a home, most people want to be sure they are making an informed decision. One of the best ways to do this is to get a home inspection. A home inspector will look at the home and provide a detailed report on its condition. This report can help you decide whether the house is a good investment. However, it is essential to remember that even after a home inspection, there are still a few reasonable requests after a home inspection that you may wish to make.

Reasonable Requests After Home Inspection

Reasonable Requests After Home Inspection

The first reasonable request is for the seller to provide a copy of the home inspection report. This is important so that you clearly understand the home’s condition. Without this report, making an informed decision cannot be easy. The home inspection report can also be critical when negotiating the home’s purchase price.

The second reasonable request is for the seller to make any necessary repairs identified in the home inspection report. These repairs can range from minor repairs, such as replacing a broken window, to major repairs, such as fixing leaking pipes. Sometimes, the seller may be willing to make these repairs before the sale is finalized. In other cases, they may agree to credit the buyer to offset the repair cost.

The third reasonable request is for the seller to prove that all necessary permits have been obtained. This includes permits for plumbing, electrical, and structural work. Without these permits, it can be challenging to insure the home, putting the buyer at risk. Sometimes, the seller may provide copies of the permits or give the buyer contact information for the local building department.

Finally, the fourth reasonable request is for the seller to provide documentation of any receipts from recent renovations that have been done to the home. This documentation can be used to verify the quality of the work and can also be used to prove that the work was done correctly. This can be especially important if the work was done more than five years ago, as newer building codes may have existed since then.

A homebuyer can make a few reasonable requests after a home inspection. These include requesting a copy of the home inspection report, requesting that the seller make necessary repairs, requesting proof of permits, and requesting documentation of any recent renovations. By making these requests and being informed about the home’s condition, a buyer can be sure they are making a sound investment.

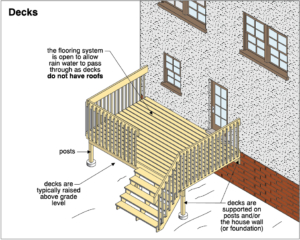
A deck is an essential feature of a home and should be inspected regularly to ensure it is safe and secure. Checking your deck can be intimidating, but ensuring it is safe for you and your family is necessary. Here are some tips on how to inspect your deck.

How to inspect your own deck

How to inspect your deck

First, assess the condition of the deck. Look for signs of wear and tear, such as rot or cracking in the wood. If you find any damaged wood or other signs of wear and tear, it may be necessary to replace it. Also, inspect the deck for loose nails or screws, and make sure the deck is securely attached to the house.

Next, check the stairs and railings. Ensure the stairs and railings are secure, and the joints between them are not loose. Also, examine the stairs and railings for signs of wear and tear, such as rust or rot. Finally, ensure the stairs and railings are securely fastened to the deck.

In addition, inspect the ledger board, which is the board that attaches the deck to the house. Look for signs of rot or damage and any loose screws or nails. Also, make sure the ledger board is securely fastened to the house.

Finally, inspect the deck for loose boards, gaps between boards, or any other signs of wear and tear. The panels should be replaced or repaired if they are open or have gaps. Also, make sure the deck is free of debris or other items that could cause a hazard.

Inspecting your deck is essential to keeping it safe and secure. Inspect your deck regularly and take the necessary steps to repair or replace any damaged components. Doing so will help ensure your deck is safe for you and your family to enjoy.

Are sewer scopes inspections worth it? This is a question that many prospective homebuyers have asked themselves before buying a new home. Sewer scopes are an essential diagnostic tool that can help to identify potential problems with a home’s sewer or septic system before the purchase is finalized.

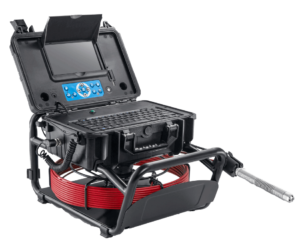
Sewer scopes provide a visual assessment of the condition of the sewer and septic system. The process typically involves inserting a long, flexible camera into the pipes to inspect the state of the pipes. This allows a professional to check for potential problems, such as blockages, root intrusion, or breaks in the pipes. This process can help to identify issues before they become too expensive or difficult to repair.

There are several benefits to having a sewer scope conducted. The primary use is that it can help to prevent costly repairs down the line. They were having a professional inspect the sewer and septic system before a purchase can identify and resolve potential problems before they become too costly. This can save the buyer thousands of dollars in expensive repairs.

Sewer Scope Inspections

Sewer Scope Inspections

A sewer scope can also help to identify potential safety hazards. The inspection can help identify potentially hazardous materials in the pipes, such as old ones that may contain lead or other dangerous materials. If these hazards are identified early, the buyer can ensure the hazardous materials are correctly removed before becoming a health risk.

Another benefit of having a sewer scope inspection is that it can help identify potential structural problems. If the pipes are not correctly aligned or connected, this can lead to significant damage that may be difficult to repair down the line. A sewer scope can help to identify these issues before they become too expensive or difficult to repair.

Finally, a sewer scope can help identify any system areas that need to be repaired or updated. For example, if the system is older, the sewer pipes may need to be replaced or updated. Identifying these issues before a purchase can help ensure the buyer is not stuck with a home with outdated or ineffective plumbing.

Overall, sewer scopes are an essential diagnostic tool for potential homebuyers. Having a sewer scope conducted before a purchase can help save money, identify safety hazards, and identify potential structural problems. While an added cost is associated with having a sewer scope conducted, the potential benefits often outweigh the costs.

Is Your Water Heater Earthquake Safe

Water heater earthquake strapping is critical in California, where earthquakes happen on a regular basis. From San Diego, Orange County and Los Angeles to San Jose, San Francisco, and Sacramento, damage from earthquakes in homes and businesses can happen without warning. Most of us never think about our water heater’s safety before an earthquake takes place.

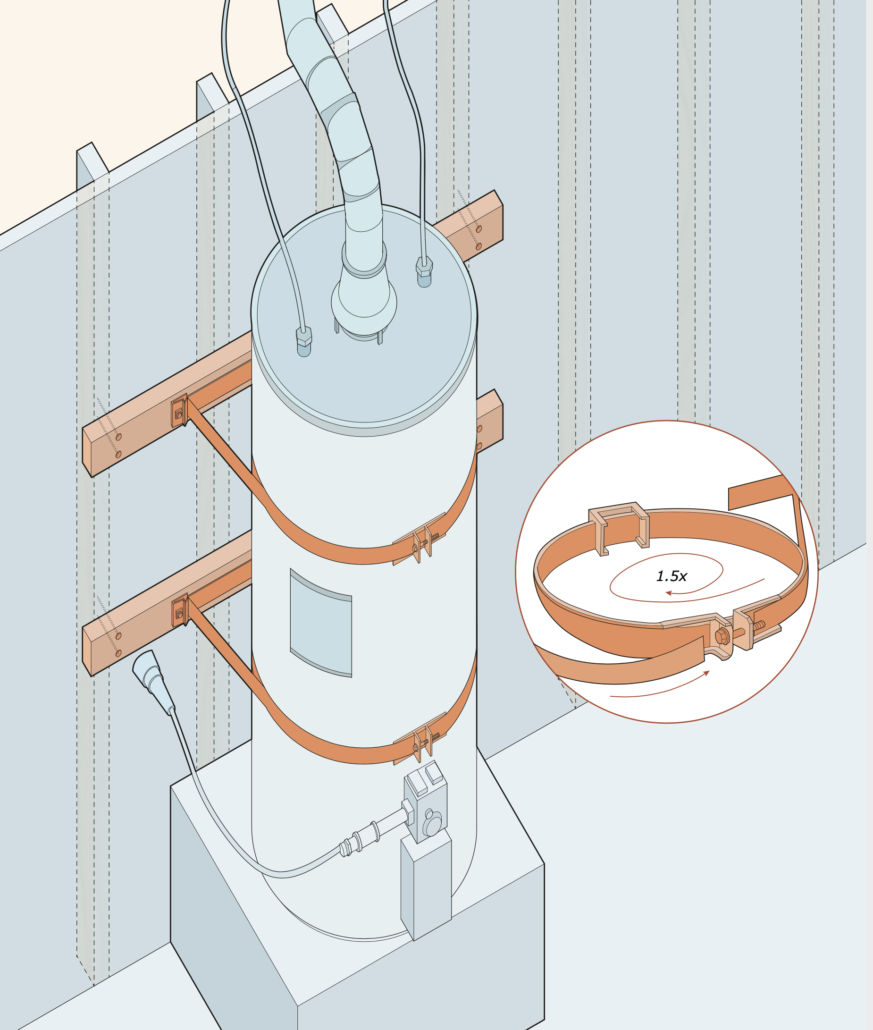
The law in California requires that your electric or gas water heater must be properly secured to a wall. These laws are in place so that water heaters will not tilt or fall during an earthquake episode and lead to a flood or fire in your home. All apartments, offices, homes, multi-family properties, and public buildings are required to have their water heater strapped securely.

water heater strapping

Your water heater also holds available cooking and drinking water in the event of an extended power outage. New laws regarding strapping help to keep water heater tanks in place. Strapping types and attachment hardware rules have been upgraded for safety since the Northridge earthquake of 1994 and the Loma Prieta quake of 1989.

If your water heater is older, you might want to have it inspected by a water heater professional installer. They will ensure that you have the safe and correct strapping that is necessary. They will also make sure the correct connectors and lines are installed and strapping and wall attachments can be upgraded.

Water Heater Strapping Things to Know

  • 30, 40 & 50-gallon water heaters require 2 straps
  • 75 & 80-gallon water heaters require 3 straps
  • 100-gallon water heaters require 4 straps
  • Strapping must be placed properly- the top 1/3 and the lower 1/3 of the water heater must be strapped to prevent rocking and tipping.

If you personally would like to determine if your water heater earthquake strapping is correct and find out if it is current to California law. Earthquakecountry.org offers some good tips for proper attachment.  https://www.earthquakecountry.org/step1/waterheater/

Signature Home Inspection has inspected thousands of water heaters in California to determine if they meet earthquake code standards. We would be happy to help you determine if your water heater, for the safety of your family and your neighborhood is properly strapped.

After an earthquake, you should check your water heater strapping to make sure that there are no gas lines leaking that can start a fire and cause a fire in your home. You should also be checking that your water heater has not fallen over and leaking water lines have not flooded your home, resulting in expensive repairs.  If proper earthquake strapping is present, your home will be much less likely to be devastated by an unfortunate water heater issue due to earthquake tilting.

We are pleased to be of service to Los AngelesOrange County, Riverside, and San Diego including their surrounding communities.

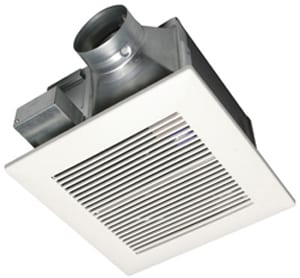
Bathroom ventilation systems are designed to exhaust odors and moist air to the home’s exterior. Typical systems consist of a ceiling fan unit connected to a duct that terminates at the roof.
Fan Function  
 The fan may be controlled in one of several ways:
  • Most are controlled by a conventional wall switch.
  • A timer switch may be mounted on the wall.
  • A wall-mounted humidistat can be pre-set to turn the fan on and off based on different levels of relative humidity.
Newer fans may be very quiet but work just fine. Older fans may be very noisy or very quiet. If an older fan is quiet, it mayBathroom Ventilation not be working well. Inspectors can test for adequate fan airflow with a chemical smoke pencil or a powder puff bottle, but such tests exceed InterNACHI’s Standards of Practice.
Bathroom ventilation fans should be inspected for dust buildup that can impede air flow. Particles of moisture-laden animal dander and lint are attracted to the fan because of its static charge. Inspectors should comment on dirty fan covers.
Ventilation systems should be installed in all bathrooms. This includes bathrooms with windows, since windows will not be opened during the winter in cold climates.
Defects
The following conditions indicate insufficient bathroom ventilation:
  • moisture stains on walls or ceilings;
  • corrosion of metal;
  • visible mold on walls or ceilings;
  • peeling paint or wallpaper;
  • frost on windows; and
  • high levels of humidity.
The most common defect related to bathroom ventilation systems is improper termination of the duct. Vents must terminate at the home exterior.
The most common improper terminations locations are:
  • mid-level in the attic. These are easy to spot;
  • beneath the insulation. You need to remember to look. The duct may terminate beneath the insulation or there may be no duct installed; and
  • under attic vents. The duct must terminate at the home exterior, not just under it.
Improperly terminated ventilation systems may appear to work fine from inside the bathroom, so the inspector may have to look in the attic or on the roof. Sometimes, poorly installed ducts will loosen or become disconnected at joints or connections.
Ducts that leak or terminate in attics can cause problems from condensation. Warm, moist air will condense on cold attic framing, insulation and other materials. This condition has the potential to cause health and/or decay problems from mold, or damage to building materials, such as drywall. Moisture also reduces the effectiveness of thermal insulation.
Mold
Perhaps the most serious consequence of an improper ventilation setup is the potential accumulation of mold in attics or crawlspaces. Mold may appear as a fuzzy, thread-like, cobwebby fungus, although it can never be identified with certainty without being lab-tested.Health problems caused by mold are related to high concentrations of spores in indoor air.  Spores are like microscopic seeds, released by mold fungi when they reproduce. Every home has mold. Moisture levels of about 20% in materials will cause mold colonies to grow. Inhaling mold spores can cause health problems in those with asthma or allergies, and can cause serious or fatal fungal infections in those with lung disease or compromised immune systems.
Mold is impossible to identify visually and must be tested by a lab in order to be confidently labeled. Inspectors should refrain from calling anything “mold” but should refer to anything that appears as mold as a material that “appears to be microbial growth.” Inspectors should include in their report, and in the inspection agreement signed by the client, a disclaimer clearly stating that the General Home Inspection is an inspection for safety and system defects, not a mold inspection.
Decay, which is rot, is also caused by fungi. Incipient or early decay cannot be seen. By the time decay becomes visible, affected wood may have lost up to 50% of its strength.
In order to grow, mold fungi require the following conditions to be present:
  • oxygen;
  • temperatures between approximately 45° F and 85° F;
  • food. This includes a wider variety of materials found in homes; and
  • moisture.
If insufficient levels of any of these requirements exist, all mold growth will stop and fungi will go dormant. Most are difficult to actually kill.
Even though mold growth may take place in the attic, mold spores can be sucked into the living areas of a residence by low air pressure. Low air pressure is usually created by the expulsion of household air from exhaust fans in bathrooms, dryers, kitchens and heating equipment.
Improper Ventilation
Ventilation ducts must be made from appropriate materials and oriented effectively in order to ensure that stale air isbath-fan-attic-termination properly exhausted.
Ventilation ducts must:
  • terminate outdoors. Ducts should never terminate within the building envelope;
  • contain a screen or louvered (angled) slats at its termination to prevent bird, rodent and insect entry;
  • be as short and straight as possible and avoid turns. Longer ducts allow more time for vapor to condense and also force the exhaust fan to work harder;
  • be insulated, especially in cooler climates. Cold ducts encourage condensation;
  • protrude at least several inches from the roof;
  • be equipped with a roof termination cap that protects the duct from the elements; and
  • be installed according to the manufacturer’s recommendations.
The following tips are helpful, although not required. Ventilation ducts should:
  • be made from inflexible metal, PVC, or other rigid material. Unlike dryer exhaust vents, they should not droop; and
  • have smooth interiors. Ridges will encourage vapor to condense, allowing water to back-flow into the exhaust fan or leak through joints onto vulnerable surfaces.

Above all else, a bathroom ventilation fan should be connected to a duct capable of venting water vapor and odors into the outdoors. Mold growth within the bathroom or attic is a clear indication of improper ventilation that must be corrected in order to avoid structural decay and respiratory health issues.

Anti-tip brackets are metal devices designed to prevent freestanding ranges from tipping. They are normally attached to a rear leg of the range or screwed into the wall behind the range, and are included in all installation kits. A unit that is not equipped with these devices may tip over if enough weight is applied to its open door, such as that from a large Thanksgiving turkey, or even a small child. A falling range can crush, scald, or burn anyone caught beneath.2014-04-14 03.16.06

Bracket Inspection

Inspectors can confirm the presence of anti-tip brackets through the following methods:

  • It may be possible to see a wall-mounted bracket by looking over the rear of the range. Floor-mounted brackets are often hidden, although in some models with removable drawers, such as 30-inch electric ranges made by General Electric, the drawers can be removed and a flashlight can be used to search for the bracket. Inspectors should beware that a visual confirmation does not guarantee that the bracket has been properly installed.
  • Inspectors can firmly grip the upper-rear section of the range and tip the unit. If equipped with an anti-tip bracket, the unit will not tip more than several inches before coming to a halt. The range should be turned off, and all items should be removed from the stovetop before this action can be performed. It is usually easier to detect a bracket by tipping the range than through a visual search. This test can be performed on all models and it can confirm the functionality of a bracket.

If no anti-tip bracket is detected, inspectors should recommend that one be installed.

Clients can contact the dealer or builder who installed their range and request that they install a bracket. For clients who wish to install a bracket themselves, the part can be purchased at most hardware stores or ordered from a manufacturer. General Electric will send their customers an anti-tip bracket for free.

schedule

According to the U.S. Consumer Product Safety Commission (CPSC), there were 143 incidents caused by range tip-overs from 1980 to 2006. Of the 33 incidents that resulted in death, most of those victims were children. A small child may stand on an open range door in order to see what is cooking on the stovetop and accidentally cause the entire unit to fall on top of him, along with whatever hot items may have been cooking on the stovetop. The elderly, too, may be injured while using the range for support while cleaning. InterNACHI inspectors who inspect ovens should never leave the oven door open while the oven is unattended.

In response to this danger, the American National Standards Institute (ANSI) and Underwriters Laboratories (UL) created standards in 1991 that require all ranges manufactured after that year to be capable of remaining stable while supporting 250 pounds of weight on their open doors. Manufacturers’ instructions, too, require that anti-tip brackets provided be installed. Despite these warnings, retailer Sears estimated in 1999 that a mere 5% of the gas and electric units they sold were ever equipped with anti-tip brackets. As a result of Sears’ failure to comply with safety regulations, they were sued and subsequently required to secure ranges in nearly 4 million homes, a measure that has been speculated to have cost Sears as much as $500 million.

In summary, ranges are susceptible to tipping if they are not equipped with anti-tip brackets. Inspectors should know how to confirm that these safety devices are present.

From Anti-Tip Brackets for Freestanding Ranges – InterNACHI http://www.nachi.org/anti-tip.htm#ixzz2zXnoPcpx

Influenced by the changes in the economic and legal environments over the past 30 years, home inspection reports have changed to accommodate increased consumer expectations, and to provide more extensive information and protection to both inspectors and their clients.

Development of Standards

Prior to the mid-1970s, inspection reports followed no standard guidelines and, for the most part, there was little or no oversight or licensure. As might be imagined, without minimum standards to follow, the quality of inspection reports varied widely, and the home inspection industry was viewed with some suspicion.

Tablet Reporting System

Tablet Reporting System

With the founding of the American Society of Home Inspectors (ASHI) in 1976, home inspection guidelines governing inspection report content became available in the form of a Standards of Practice. Over time, a second, larger trade association, the International Association of Certified Home Inspectors (InterNACHI), came into existence, and developed its own standards.

InterNACHI has grown to dominate the inspection industry and, in addition to its Residential Standards of Practice, it has developed a comprehensive Standards of Practice for the Inspection of Commercial Properties.  Today, most types of inspections from mold to fire door inspections are performed in accordance with one of InterNACHI’s Standards of Practice.

As a consumer, you should take the time to examine the Standards of Practice followed by your inspector. If he is unaffiliated with any professional inspection organization, and his reports follow no particular standards, find another inspector.

Generally speaking, reports should describe the major home systems, their crucial components, and their operability, especially the ones in which failure can result in dangerous or expensive-to-correct conditions. Defects should be adequately described, and the report should include recommendations.

Reports should also disclaim portions of the home not inspected. Since home inspections are visual inspections, the parts of the home hidden behind floor, wall and ceiling coverings should be disclaimed.

Home inspectors are not experts in every system of the home, but are trained to recognize conditions that require a specialist inspection.

Home inspections are not technically exhaustive, so the inspector will not disassemble a furnace to examine the heat exchanger closely, for example.

Standards of Practice are designed to identify both the requirements of a home inspection and the limitations of an inspection.

Checklist and Narrative Reports

In the early years of the home inspection industry, home inspection reports consisted of a simple checklist, or a one- or two-page narrative report.

Checklist reports are just that; very little is actually written. The report is a series of boxes with short descriptions after them. Descriptions are often abbreviated, and might consist of only two or three words, such as “peeling paint.” The entire checklist might only be four or five pages long. Today, some inspection legal agreements are almost that long!

Because of the lack of detailed information, checklist reports leave a lot open to interpretation, so that buyers, sellers, agents, contractors, attorneys and judges may each interpret the information differently, depending on their motives.

In the inspection business, phrases that describe conditions found during an inspection are called “narratives.”  Narrative reports use reporting language that more completely describes each condition. Descriptions are not abbreviated.

Both checklist and narrative reports are still in use today, although many jurisdictions are now beginning to ban checklist reports because the limited information they offer has resulted in legal problems.

From the standpoint of liability, narrative reports are widely considered safer, since they provide more information and state it more clearly.

Many liability issues and problems with the inspection process are due to misunderstandings about what was to be included in the report, or about what the report says.

For example, in 2002, an investor bought a 14-unit hotel in California.  The six-page narrative report mentioned that flashing where the second-story concrete walkway met the building was improperly installed, and the condition could result in wood decay. Four years later, the investor paid out almost $100,000 to demolish and replace the entire upper walkway. In some places, it was possible to push a pencil through support beams.

Although the inspector’s report had mentioned the problem, it hadn’t made clear the seriousness of the condition, or the possible consequences of ignoring it. Today, a six-page report would be considered short for a small house.

Development of Reporting Software

Years ago, when computers were expensive to buy and difficult to operate, inspection reports were written by hand. As computers became simpler to operate and more affordable, inspection software began to appear on the market.

Today, using this software, an inspector can chose from a large number of organized boilerplate narratives that s/he can edit or add to in order to accommodate local conditions, since inspectors in a hot, humid city like Tampa Bay, Florida, are likely to find types of problems different from those found by inspectors in a cold, dry climate, like Salt Lake City, Utah.

Using narrative software and checking boxes in categories that represent the home systems, an inspector can produce a very detailed report in a relatively short time.

For example, using a checklist report, an inspector finding a number of inoperable lights in a home would check a box in the “INTERIOR” section labeled something like “some lights inoperable,” and that would be the limit of the information passed on to the client.

Using inspection software, in the “INTERIOR” section of the program, an inspector might check a box labeled “some lights inoperable.”  This would cause the following narrative to appear in the “INTERIOR” section of the inspection report:

“Some light fixtures in the home appeared to be inoperable. The bulbs may be burned out, or a problem may exist with the fixtures, wiring or switches.

If after the bulbs are replaced, these lights still fail to respond to the switch, this condition may represent a potential fire hazard, and the Inspector recommends that an evaluation and any necessary repairs be performed by a qualified electrical contractor.”

Standard disclaimers and other information can be pre-checked to automatically appear in each report.

Narrative Content

Narratives typically consists of three parts:

  1. a description of a condition of concern;
  2. a sentence or paragraph describing how serious the condition is, and the potential ramifications, answering questions such as, “Is it now stable, or will the problem continue?” or “Will it burn down the house?” and “When?”; and
  3. a recommendation. Recommendations may be for specific actions to be taken, or for further evaluation, but they should address problems in such a way that the reader of the report will understand how to proceed.

“Typically” is a key word here. Some narratives may simply give the ampacity of the main electrical disconnect. There is no need for more than one sentence. Different inspectors would include what they think is necessary.

Report Content

Inspection reports often begin with an informational section which gives general information about the home, such as the client’s name, the square footage, and the year the home was built.

Other information often listed outside the main body of the report, either near the beginning or near the end, are disclaimers, and sometimes a copy of the inspection agreement, and sometimes a copy of the Standards of Practice.  A page showing the inspector’s professional credentials, designations, affiliations and memberships is also often included.  And it is a good idea to include InterNACHI’s Now That You’ve Had a Home Inspectionbook.

Inspection reports often include a summary report listing major problems to ensure that important issues are not missed by the reader. It’s important that the reader be aware of safety issues or conditions which will be expensive to correct. With this in mind, some inspectors color-code report narratives, although many feel that color-coding exposes them to increased liability and don’t do this.

Software often gives inspectors the choice of including photographs in the main body of the report, near the narrative that describes them, or photographs may be grouped together toward the beginning or end of the report.

A table of contents is usually provided.

The main body of the report may be broken down into sections according to home systems, such as “ELECTRICAL,” “PLUMBING,” “HEATING,” etc., or it may be broken down by area of the home:  “EXTERIOR,” “INTERIOR,” “KITCHEN,” “BEDROOMS,” etc.

It often depends on how the inspector likes to work.

Sample Reports

Many inspectors have websites which include sample inspection reports for prospective clients to view. Take the time to look at them. Also often included is a page explaining the scope of the inspection. The inspection contract is usually included on the website, and it should give you a good idea of what will be included in the report.

In conclusion, for consumers to have realistic expectations about what information will be included in the home inspection report, follow these tips:

  • read the Standards of Practice;
  • read the Contract;
  • view a sample Inspection Report; and
  • talk with the inspector.

Article information by Nachi.org

Signature Home Inspection is a Certified Home Inspection service located in California serving Orange County, San Diego County, Los Angeles County, Riverside County, Santa Clara County, San Mateo County, San Francisco County, Contra Costa County, and San Bernardino County California.

www.signaturemore.com                                               888-860-2688

Inspecting Wood Shingle and Shake Roofs – Although asphalt shingles are the most commonly used roofing material in the United States, another type of roofing material the home inspector may encounter is wood shingles or wood shakes.

Wood shingles are sawn, lie flat on one another, and are thinner and more uniform than wood shakes.  Wood shakes are thicker

Wood Shingle Roof

Wood Shingle Roof

with an uneven surface and uneven thickness.  Shakes can be split on the face and have sawn backs (handsplit), split on both sides (straight-split and tapersplit), or sawn on both sides (tapersawn). Wood shakes can come in different sizes and shapes and surfaces.  The most common sizes for wood shakes are 18 inches and 24 inches in length.  All shakes are available in two grades (premium and No.1) and are graded to one face according to grain angle, flaws, and amount of heartwood/sapwood.

SHINGLES
Shingles are similar in appearance to tapersawn shakes except that they are thinner. Whereas the minimum butt-end thickness for tapersawn shakes is at least 5/8 inche, shingles have a butt-end thickness of about 3/8 to ½ of an inch. Shingles and shakes are usually cedar, but can also be made from Redwood.  The minimum slope for both wood shingles and shakes is 3:12 or greater.  The greater the slope, the longer they will last.

Wood shingles and shakes should be installed over solid or spaced plank sheathing.  Shakes are laid with a starter course under the first course of shakes at the roof’s edge with a 1 ½ inch overhang as a drip edge.  An inter-layment of roofing felt is laid between each course of shakes.  With shingles, the inter-layment is not used.  Shingles are laid from ¼ inch to 3/8 inch apart; shakes at 3/8 inch to 5/8 inch apart.  This spacing allows the shingles and shakes to expand when wet. If the proper spacing is not observed during installation, shingles and shakes can buckle, split, and cup when they expand.  Gaps between shingles and shakes should be staggered from course to course.  Each shingle and shake is fastened in place with 2 nails with minimum fastener penetration of ½ inch.

When inspecting the wood shingle or shake, always take the time to determine first whether or not you should walk on the roof.  Shingles and shakes that are wet, covered with moss, or mildew are very slippery. Do not walk on the roof if any of those conditions exist. If the shingles or shakes are badly deteriorated, you’ll break them if you walk on the roof. Avoid getting on the roof if the condition is bad.

If you do get on the roof, try to walk across the roof, not directly up and down from the eave to ridge. Be careful, as dry wood roofs in good condition can be tricky.  However, before mounting the roof, start inspecting the wood shingle or shake roof from the ground.  Looking at the roof from this low vantage point can help you spot areas that are excessively buckled or deteriorated.  If the weather is dry, you may notice some curling and shingles and shakes that have slightly lifted.  When it rains, they swell up and lay back down.

With a wood roof, the inspection of the roof from the attic is very important. The home inspector should be sure to check the type of roof sheathing and determine if it is appropriate. Remember, wood shingles and shakes should have solid or spaced sheathing.  Spaced sheathing allows the wood to dry out from both sides.

During the exterior inspection, the home inspector should inspect the condition of the wood shingle and shake roof for the following:

  • Improper Installation:  In dry weather, shingles should not be butted tight against each other and certainly not tight and buckled, split, and cupped.  Such shingles are laid without proper spacing. Note that gaps between shingles and shakes are staggered.  Check the overhang at the eaves.
  • Softness and rot: When the wood roof is not allowed to dry out, shingles and shakes can deteriorate.  In dry weather, you may see wood roofs that remain damp. Or you may see those where the butt ends are breaking up, splitting, and cracking.  The home inspector can probe for softness and deterioration. 
  • Damaged and weathered: Over time, sunlight can dehydrate shingles and shakes, causing them to become brittle and split and cup.  Wind-blown sand can erode the shingle and wear it down.  Watch for splits that lie directly under the gap in the course above making a pathway for water to enter the roof. Watch for damage that can occur from rubbing or falling tree branches.  You may also see evidence of someone else being on the roof.  There may be evidence of roof or gutter cleaners that wore shoes with spikes for traction that have left distinct holes on the roof.
  • Loose or missing: Look for any areas on the roof where the shingles are loose or missing.  If you come across loose or missing shingles or shakes, recommend a qualified roofer repair or replace the loose or missing shingles/shakes.
  • Moss and mildew: Moss present on the wood roof should be reported.  The most common cause of shingle and shake deterioration is the buildup of moss. If you see moss or algae, be careful, but you can probe these areas to see if there is any wood deterioration.  Also check the roof framing below mossy areas, as it can also be damaged from moss.  Moss should be removed from the roof, and there are chemical treatments available to kill moss.   There are also preservative treatments available that will retard the growth of moss.  If shingles and shakes are very dark or black, that is a sign of mildew.  Mildew can be scraped off but seldom without damaging the shingle itself. There are chemical treatments that can kill mildew.  Removal and suggestions on how to remove moss and mildew is best left to a qualified roofing contractor that is familiar with wood shingles/shakes.
  • Water penetration: The home inspector should inspect the wood roof carefully for water penetration.  Make note of rotted areas on the exterior and be sure to inspect the roof framing from the attic for any evidence of leaking

Perhaps the most difficult part of inspecting a wood roof is determining its remaining life.  A roof in good condition with a long life ahead of it and one that is in poor condition is both easy to identify. It is the in between ones that can be difficult.  It is a good idea to ask the home owner if they know the age of the roof.  A 10- year old roof in bad condition has serious problems and it is aging too fast. In general when about 15-20% of the roof requires repair, you should recommend a replacement soon. We suggest the homeowners have a sealant applied to the wood roofing-a water resistant stain that includes a mildecide and moss retarder.  This will help prolong the life of the roof.

Article information by AHIT and the USDA Forest

Signature Home Inspection is a Certified Home Inspection service located in California serving Orange County, San Diego County, Los Angeles County, Riverside County, Santa Clara County, San Mateo County, San Francisco County, Contra Costa County, and San Bernardino County California.

www.signaturemore.com                                               888-860-2688

Inspecting basement egress rescue openings – It should be no surprise that there are specific requirements for basement egress windows and rescue openings. As a

basement egress & rescue openings

Basement egress & rescue openings

home inspector, it is important to familiarize yourself with these requirements. Local regulations and codes vary across the country, so be sure to familiarize yourself with the requirements in your area to make yourself a more knowledgeable home inspector.

Not all basement rooms need a legal egress window.  Where basements contain one or more sleeping rooms, emergency egress and rescue openings are required in each sleeping room.  Remember, as home inspectors, safety is our number one priority for occupants, so corners should not be cut when inspecting this aspect of a basement.

Below are some important numbers and rules to keep in mind when inspecting basement bedrooms that have emergency escape and rescue opening(s).

Here is what the 2012 IRC Code states:

  • The maximum sill height, measured from the finished floor to the bottom of the clear opening is 44 inches.
  • The minimum opening area is 5.7 square feet (Exception is grade floor openings, which must have a minimum net clear opening of 5 square feet).
  • The minimum opening height is 24 inches.
  • The minimum opening width is 20 inches.
  • The minimum horizontal area of a window well is nine square feet, with a minimum horizontal projection and width of 36 inches. The area of the window well must allow the emergency escape and rescue opening to be fully opened.
  • Window wells shall be equipped with a permanently installed ladder or steps if the vertical depth of the window well is greater than 44 inches. The ladder or steps must be usable with the window fully open.
  • The ladder may project six inches into the required window well space.
  • Emergency escape and rescue openings need to be operational from the inside without the use of keys, tools or special knowledge.
  • Emergency escape windows under decks and porches are allowed as long as the deck allows the emergency escape window to be fully opened and provides a path not less than 36 inches in height to a yard or court.

Once again, local regulations and codes may vary from these IRC codes, so be sure to familiarize yourself with what is required in your area in order to properly inspect basement egresses and rescue openings.

Signature Home Inspection is a Certified Home Inspection service located in California serving Orange County, San Diego County, Los Angeles County, Riverside County, Santa Clara County, San Mateo County, San Francisco County, Contra Costa County, and San Bernardino County California.

www.signaturemore.com                                               888-860-2688