Maintaining a water softener ensures that your home has the best water quality. Whether you are looking to protect your home’s plumbing system, reduce your water bills, or improve the taste of your tap water, a water softener can help. But, like any appliance, your water softener will require regular maintenance to ensure it functions correctly. In this article, we will discuss tips on maintaining your water softener.

Water Softener

Water Softener

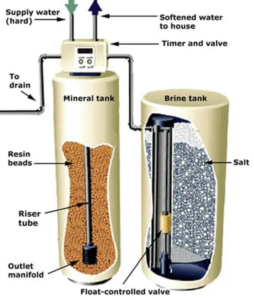
Firstly, check the salt levels in your water softener. Most water softeners use salt to remove the minerals that cause hard water. Over time, the salt levels will decrease, and you will need to refill them. Look for the “salt level” indicator on your water softener and make sure it is complete. If not, use a scoop to fill it with salt. Do this at least once every six months or when the indicator indicates it is low.

Secondly, make sure your water softener is set correctly. You can do this by checking the settings on the control valve. The settings will vary depending on the type of softener you have. Look for the “grain setting” and ensure it is appropriate for your water. If you are unsure, consult the manufacturer’s manual for specific instructions.

Thirdly, regularly clean your water softener. Remove any dirt, debris, or sediment that has built up, and rinse out any accumulated salt. This will help keep the system running smoothly and prevent any potential damage. You should clean your water softener at least once every 3-5 years.

Finally, check the pressure of your water softener. The pressure of your water softener should remain consistent, so make sure it is not fluctuating. If it is, you may need to adjust the pressure settings on the control valve.

By following these simple tips for water softener maintenance, you can ensure your home has the best water quality possible. Remember these tips; you should have no problem maintaining your water softener.

What is a slab leak? A slab leak is a leak in the water pipes that run beneath the concrete slab foundation of a home. Various issues, including corrosion or damage from earthquakes or plumbing accidents, cause it. If left unchecked, a leak can cause severe damage to the structure and foundation of a home.

Slab Leak

Signs of a Slab Leak

Several signs can indicate a leak in the slab. Awareness of these signs is the best way to prevent damage to the home’s foundation. Here are the most common symptoms of a leak:

Wet Spots on Floors

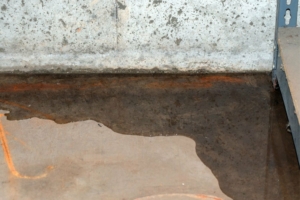
It could signify a leak if you notice any wet spots on your floors. The water seeping up from the slab can cause the floors to become damp or even wet.

Low Water Pressure

A decrease in water pressure can also signify a leak. This is because the water that is supposed to flow through the pipes is instead leaking out of the slab.

Increased Water Bill

If you notice an unusually high-water bill, it could signify a leak. This is because the water leaking from the slab will still be added to your water bill.

Cracked or Sinking Foundation

It could signify a leak if you notice cracks or sinking in your home’s foundation. This is because the leaking water can cause the slab to weaken, leading to cracks or settling.

Unusual Sounds from Pipes

It could signify a leak if you hear unusual sounds from your pipes, like gurgling or hissing. This is because the water leaking out of the slab can cause air bubbles and other strange noises.

Conclusion

A leak in the slab is a serious issue that can cause significant damage to the structure and foundation of a home. That’s why it’s essential to be aware of the signs of a leak in the slab to prevent severe damage. The most common symptoms of a slab leak include wet spots on floors, low water pressure, an increased water bill, cracked or sinking foundations, and unusual sounds from pipes. If you notice any of these signs, it’s essential to contact a plumber to investigate and repair the leak as soon as possible.

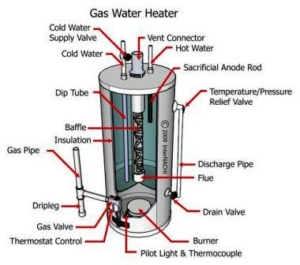
A water heater tank should be installed inside a water heater drain pan in a dwelling where a leak from the tank could cause damage to the structure or property.  The pan is intended to catch water leaks from the tank or associated connections or condensate from the tank.  The pan should be made of galvanized steel or other approved material.  Pre-fabricated aluminum and plastic pans are standard and widely used.  Aluminum and plastic pans may not be allowed by every authority having jurisdiction (AHJ) or code official because they are not made of galvanized steel, and some tank manufacturers require a metal pan only.

Water Heater Drain Pan

Water Heater Drain Pan

A relief-valve pipe terminating into a water leak catch pan is not permitted because the pan is not an indirect waste receptor.  Most pans have only a ¾-inch-diameter drain outlet, which is incapable of using gravity to drain the pressurized discharge of the relief valve at full flow.

The pan should not be less than 1-1/2 inches deep.  The pan should be of sufficient size and shape to catch all dripping water or condensation leaks.  The pan should be drained by an indirect waste pipe having a minimum diameter of 3/4-inch.  The pan drain must not be reduced in size over its entire length because a reduction will act as a restriction and will impede the discharge.

The pan must not connect directly to the drainage system.  The water heater drain pan should terminate over a suitably located indirect waste receptor or floor drain or extend to the exterior.  An air gap must be provided to prevent backflow when the pan drain terminates into an indirect waste receptor or a floor drain.  When the pan ceases at the exterior of the dwelling, it should terminate at least 6 inches and, at most, 24 inches above the adjacent ground surface.  This makes the pan low enough not to be a nuisance and high enough to prevent the pan drain from becoming blocked by vegetation, snow, or ice.

Drain Waste Vent Basics – Every trap and trap fixture should be vented. The purpose of venting is to protect the trap seal of each trap. The vent system reduces pressure differences in the drainage system. Venting protects the trap seals from positive pressures and siphonage. At least one vent pipe should extend to the outdoor air for a dwelling.

Drain Vent

Any vent’s minimum size is half the drain pipe’s required size but not less than 1-1/4 inches (32 mm). All vent and branch vent pipes should be sloped and connected to drain back to the drainage pipe using gravity.

The most common way of venting is to install a separate or individual vent for each trap or trapped fixture, which is then connected to the dwelling’s main venting system. The other venting methods include standard venting, wet venting, waste-stack venting, circuit venting, combination drain-and-vent, and island-fixture venting.

A standard vent is one vent that serves more than one fixture, functioning as an individual vent for each institution. Wet venting is venting single or double bathroom groups or combinations thereof, where one vent pipe may serve all the fixtures connected to the wet vent. Waste-stack venting is venting individual fixtures through a drainage stack, and the oversized stack functions as the vent. Circuit venting is venting up to eight fixtures with a single vent pipe. A combination drain-and-vent system is restricted to floor drains, sinks, and lavatories and relies on the oversized drain pipe. Island-fixture venting has a vent installed below the flood-level rim of the fixture before rising to connect to another vent.

Here are some essential terms and definitions related to different types of vents:

  • The stack is a general term to refer to any main vertical drain, waste, and vent (DWV) line that extends through at least one story of a building.
  • The waste pipe or waste stack conveys only liquid sewage, not containing fecal material. Waste pipes do not give human fecal matter.
  • DWV is the abbreviation for drain (or soil), waste, and vent piping used commonly in houses. The pipe will often be labeled “DWV.”
  • The soil stack or soil pipe conveys sewage containing fecal material. In the plumbing trade, “soil pipe” is a common name for the cast-iron drainage pipe. The term, however, is not specific to a cast-iron pipe and refers to any DWV drainpipe that conveys the discharge of water closets, urinals, or any other fixture that receives human waste.
  • The stack vent is provided for the waste stack. The stack vent is the extension of a soil or waste stack above the highest horizontal drain that is connected to the stack. This is the main commonly-observed observed pipe penetrating the sloped roof surface, and it may also be visible in the unfinished attic space. Generally, a stack vent extends to the open air and can serve as the main vent to which branch vents connect.
  • The vent stack is the vertical vent pipe installed primarily for providing air circulation to and from any part of the drainage system, which is the piping in a home that carries away sewage or other liquid waste.
  • local vent stack is a vertical pipe into which other pipe connections are made from the fixture side of traps. The local vent stack removes vapor or foul air from the fixture.
  • The building drain is the lowest pipe of a drainage system that drains the soil, waste, and other drainage pipes from inside, and it extends at least 30 inches beyond the exterior building walls. This is extended into the building sewer.
  • The building sewer is the piping that extends from the end of the building drain and connects to the public sewer, private sewer, or individual sewage system.

Sewer lines are critical parts of the plumbing system, yet they often attract the least amount of attention until major problems occur. Broken and clogged sewer lines add up to significant damage in a short amount of time. When contaminated water doesn’t drain properly, you could deal with mold and bacterial growth in critical areas of your home and business. Not to mention the sheer inconvenience of having to deal with backed-up toilets and sinks.

Common Sewer Line Issues

Common Sewer Line Issues

The good news is that you can often catch sewer line issues early when you know to look out for these common signs of a problem with the main drain pipe.

Smelling Foul Odors

A sewage backup in the pipes often contains contaminated waste that includes decaying organic matter. One might detect this as a foul odor that emanates from the drains when you use them. When you have clear sewer lines, one should never notice a smell that comes through the pipes. Always mention unpleasant and new odors that you notice while showering or washing dishes in the sink. These smells could indicate a big problem with the sewer lines.

Slow Draining Tubs and Sinks

Other fixtures in your business or house drain out through the same main sewer pipe as the toilets. Bathtubs and sinks also develop clogs that can get lodged further down the line. It is best to use strainers in the upper drains to keep food debris, hair, and other materials going down into the pipes as a general rule. If you notice that a drain runs slowly, then arrange to have the clog removed before it leads to a major flood in the house.

Frequent Toilet Backups

An occasional clogged toilet might be caused by using too much toilet paper, but you should also worry if it happens regularly. Large clogs can build up in sewer lines over a long period of time. This is especially true if people put items down the drain that don’t belong there. Feminine hygiene products and flushable wipes are two common culprits for serious clogs that develop deep within the main drain pipe.

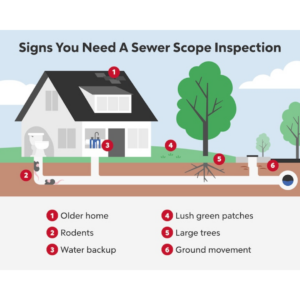
Noticing Lush Spots In the Lawn

A lawn filled with green grass is desirable for most landscaping plans, but there are times when one might need to investigate spots with fast growth. Sewer line breaks leak water into the surrounding ground containing organic materials that act as a fertilizer. Soggy areas in your grass can also indicate a plumbing leak that needs repair. If these areas grow extra fast and greener than the surrounding vegetation, it could be due to a crack in the pipes. When you call for sewer line repair, Dallas technicians can come out with special equipment to identify where a crack may exist below the ground surface.

Discovering Mold and Mildew

The sewer lines running from the fixtures and out of your home travel through the walls. In highrise buildings, you might also have sewer lines that run through the ceiling. Cracks in hidden pipes can cause water leaks in areas that may not always make sense. For instance, you might discover a wet spot with microbial growth along with the ceiling of a bottom floor. Finding mildew or mold without an obvious cause often means a hidden pipe leak is somewhere nearby.

Gurgling Sounds

A smooth-running drain should allow the water to flow through it without too much noise. Bubbling or gurgling sounds indicate that something might be changing how the water flows through the pipe. In older homes with large trees growing nearby, this is often a sign that roots might be growing into the drain pipes. This is most common in buildings that have clay or concrete sewer lines. Replacing or repairing these pipes with newer materials prevents major breaks in the pipes and nasty clogs.

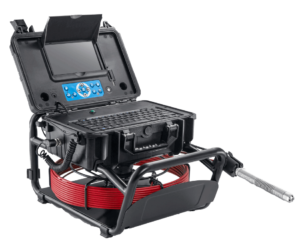
Have you noticed these signs of a problem with your home or commercial building’s main sewer line? Signature Home Inspection provides sewer line inspections in Orange County and surrounding counties. Give us a call or head online to request a free quote and inspection today. Our team of inspection technicians can quickly identify the issue and provide repairs that prevent serious damage to your property.