Where do most pools leak from? Pool leaks are more common than many people realize. A leaking pool can be a major headache for homeowners, leading to costly repairs and wasted water. Knowing the most common sources of pool leaks can help prevent them from occurring in the first place.

Where do most pools leak from?

Where do most pools leak from?

The most frequent source of pool leaks is the plumbing system. This includes the pipes that run from the pool equipment to the pool itself. Often, these pipes are made of PVC or polyethylene, which can be prone to cracking and leaking over time. To prevent these pipes from leaking, it’s essential to inspect them regularly and replace them before they have a chance to break.

Another common source of pool leaks is the skimmer. The skimmer is responsible for removing debris from the pool and is typically located near the top of the pool wall. If the skimmer is not regularly cleaned or inspected, debris and other materials can build up and cause damage to the skimmer and the pool itself.

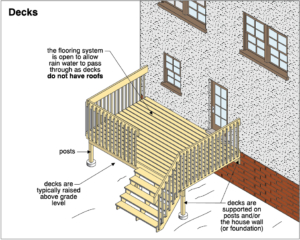
Another potential source of pool leaks is the pool deck. The pool deck is the area around the pool’s perimeter and is where the pool meets the ground. If the pool deck is not sealed correctly, water can seep through the cracks and cause leaks. It’s essential to use a sealant on the pool deck to ensure it is adequately sealed and prevent water from leaking out.

Finally, the pool liner can also be a source of leaks. Pool liners are made of vinyl or fiberglass and can be prone to tearing and cracking over time. To prevent leaks, it’s essential to regularly inspect the pool liner and replace it as soon as any signs of damage are noticed.

By understanding the most common sources of pool leaks, homeowners can take the necessary steps to prevent them from occurring. Regularly inspecting the plumbing system, skimmer, pool deck, and pool liner can help ensure the pool functions correctly and remains leak-free.

What are the 5 types of maintenance?

What are the 5 types of maintenance?

Maintenance is an essential part of any home purchase. Whether buying a newly constructed single home or a multi-unit apartment building, maintenance is a crucial investment aspect. Without proper maintenance, the property could suffer significant damage, leading to costly repairs. There are five main types of maintenance that any home buyer should be aware of before purchasing a property.

First, preventative maintenance is a proactive approach to ensuring that all property components are in good working condition. This type of maintenance involves scheduling regular inspections and ensuring that all major appliances, systems, and structures are regularly checked for safety and performance. This type of maintenance can help identify minor problems before they become larger ones, saving a home buyer a lot of money.

Second, corrective maintenance is reactive and is used to address issues that have already occurred. This type of maintenance involves understanding the existing problems and addressing them through repairs or replacements. This type of maintenance is often the most expensive, as many repairs or replacements are required to restore the property to its original condition.

Third, predictive maintenance is a proactive approach that uses data and analytics to predict when specific property components may fail or require maintenance. This type of maintenance can help to minimize the cost of repairs and replacements, as the home buyer can address the issues before they become costly.

Fourth, conditional preventive maintenance is used to help protect a property from certain types of damage. This type of maintenance may include installing flood markers, fire alarms, and other types of protective devices to help protect the property from damage. This type of maintenance can help reduce the chances of a significant loss, saving the home buyer a lot of money.

Finally, emergency maintenance is used to address significant issues that have occurred. This type of maintenance can involve replacing important property components and can often be the most expensive. This type of maintenance can help to restore the property to its original condition quickly but can be very costly.

These five types of maintenance are essential for any home buyer to understand before investing. Understanding the different kinds of maintenance and their costs can help a home buyer make an informed decision about which type of maintenance suits their property. With proper care, any home buyer can have a property that will last for years.

Troubleshooting a garage door can be one of the most frustrating tasks for a homeowner. The process can be much simpler with the right knowledge and tools. This article will cover the basics of troubleshooting a garage door and explain the steps you need to take to diagnose and resolve the issue.

How to Troubleshoot a Garage Door

How to Troubleshoot a Garage Door

The first step in troubleshooting a garage door is identifying the problem. This can be done by listening to the sound made when the door opens and closes and visually inspecting the hardware and components. Common issues include broken springs, misaligned tracks, or a worn-out door opener.

Once the issue is identified, the next step is determining the best way to fix it. If the problem is a broken spring, replacing it with a new one is best. If the issue is misaligned tracks, you may need to adjust them to get the door to open and close properly. If the problem is with the door opener, you may need to replace the entire unit.

When replacing any parts on the garage door, it is important to follow the instructions included with the new parts. This will ensure the installation is done correctly and the door will operate as it should. Additionally, it is important to use the proper tools for the job. Using the wrong tools can lead to further damage and potentially more costly repairs.

Finally, once the issue is resolved, it is important to maintain the garage door regularly. This includes lubricating the moving parts and checking the springs and tracks for any signs of wear. Regular maintenance can help prevent future issues and ensure your garage door operates safely and efficiently.

Overall, troubleshooting a garage door can be daunting for many homeowners. However, the process becomes much simpler with the right knowledge and tools. It is important to identify the issue, determine the best way to fix it, use the proper tools and instructions, and maintain the garage door regularly. With these steps, you can successfully troubleshoot any issues with your garage door and keep it functioning properly for years to come.

How do I know if my main sewer line is clogged? Clogged main sewer lines can be one of the most challenging and frustrating plumbing issues. Fortunately, there are a few warning signs and solutions to help you identify and troubleshoot a clogged main sewer line.

The first sign of a clogged main sewer line is the presence of slow-draining or clogged drains. This is usually caused by an accumulation of debris, such as hair, grease, and food particles, that build up and restrict water flow through the pipes. If you notice water backing up in your sinks, showers, or toilets, it may be a sign that the main sewer line is clogged.

How do I know if my main sewer line is clogged?

How do I know if my main sewer line is clogged?

Another indication of a clogged main sewer line is a strong sewage smell from the drains. This is because debris and waste buildup prevent airflow through the pipes. This smell can be particularly pungent if it has been building up in the lines for some time.

If you are ever in doubt about whether or not your main sewer line is clogged, it is best to call a professional plumber. They have the necessary tools and experience to identify the problem and provide an effective solution. A plumbing professional can use specialized equipment, such as a sewer camera, to inspect the pipes and determine the exact cause of the clog.

Sometimes, the clog can be cleared using a drain snake or other plumbing tool. If the clog is more severe, a professional plumber may need to use powerful chemicals to dissolve the debris and clear the blockage.

At Signature Home Inspection, we provide a wide range of services to help you identify and resolve any plumbing issues, including clogged main sewer lines. Our experienced technicians are equipped with the latest tools and technology to identify and diagnose the problem quickly.

We understand that plumbing issues can be stressful and time-consuming to deal with. That’s why we strive to provide fast and reliable service so you can return to your daily routine as soon as possible. If you suspect you may have a clogged main sewer line, don’t hesitate to call us.

A deck is an essential feature of a home and should be inspected regularly to ensure it is safe and secure. Checking your deck can be intimidating, but ensuring it is safe for you and your family is necessary. Here are some tips on how to inspect your deck.

How to inspect your own deck

How to inspect your deck

First, assess the condition of the deck. Look for signs of wear and tear, such as rot or cracking in the wood. If you find any damaged wood or other signs of wear and tear, it may be necessary to replace it. Also, inspect the deck for loose nails or screws, and make sure the deck is securely attached to the house.

Next, check the stairs and railings. Ensure the stairs and railings are secure, and the joints between them are not loose. Also, examine the stairs and railings for signs of wear and tear, such as rust or rot. Finally, ensure the stairs and railings are securely fastened to the deck.

In addition, inspect the ledger board, which is the board that attaches the deck to the house. Look for signs of rot or damage and any loose screws or nails. Also, make sure the ledger board is securely fastened to the house.

Finally, inspect the deck for loose boards, gaps between boards, or any other signs of wear and tear. The panels should be replaced or repaired if they are open or have gaps. Also, make sure the deck is free of debris or other items that could cause a hazard.

Inspecting your deck is essential to keeping it safe and secure. Inspect your deck regularly and take the necessary steps to repair or replace any damaged components. Doing so will help ensure your deck is safe for you and your family to enjoy.

Maintaining a water softener ensures that your home has the best water quality. Whether you are looking to protect your home’s plumbing system, reduce your water bills, or improve the taste of your tap water, a water softener can help. But, like any appliance, your water softener will require regular maintenance to ensure it functions correctly. In this article, we will discuss tips on maintaining your water softener.

Water Softener

Water Softener

Firstly, check the salt levels in your water softener. Most water softeners use salt to remove the minerals that cause hard water. Over time, the salt levels will decrease, and you will need to refill them. Look for the “salt level” indicator on your water softener and make sure it is complete. If not, use a scoop to fill it with salt. Do this at least once every six months or when the indicator indicates it is low.

Secondly, make sure your water softener is set correctly. You can do this by checking the settings on the control valve. The settings will vary depending on the type of softener you have. Look for the “grain setting” and ensure it is appropriate for your water. If you are unsure, consult the manufacturer’s manual for specific instructions.

Thirdly, regularly clean your water softener. Remove any dirt, debris, or sediment that has built up, and rinse out any accumulated salt. This will help keep the system running smoothly and prevent any potential damage. You should clean your water softener at least once every 3-5 years.

Finally, check the pressure of your water softener. The pressure of your water softener should remain consistent, so make sure it is not fluctuating. If it is, you may need to adjust the pressure settings on the control valve.

By following these simple tips for water softener maintenance, you can ensure your home has the best water quality possible. Remember these tips; you should have no problem maintaining your water softener.

How to clean your washer and dryer is an essential part of home maintenance that helps keep your appliances running smoothly and efficiently. The process is simple and only requires a few items and steps to ensure your washer and dryer are sparkling clean.

How to clean your washer and dryer

How to clean your washer and dryer

The first step is removing lint or other debris from the lint traps. This should be done regularly, as lint can clog the vents and reduce the efficiency of the machines. Next, use a dry, soft cloth to wipe down the lint traps and the exterior of the machines. This will help to remove any dust and grime that has built up over time.

Once the exterior is clean, it’s time to clean the inside of the washer and dryer. You’ll need a small amount of mild detergent and some white vinegar to do this. Mix the detergent and vinegar to form a soapy solution, and then use a soft cloth to wipe down the inside of the washer and dryer. Be sure to pay special attention to the seals and gaskets, as these are often missed when cleaning.

Once the inside has been cleaned, it’s time to clean the filter and drain system. This should be done once every few months to ensure that any lint or debris accumulating doesn’t clog the system and reduce efficiency. To do this, remove the filter and place it in a sink filled with the soapy solution you made earlier. Let it soak for about 20 minutes, then rinse with warm water. The drain system can be cleaned with the same method.

Finally, use a soft cloth to shine up all metal surfaces, like the knobs and control panel. This will help to keep the washer and dryer looking good and running smoothly.

Cleaning your washer and dryer is an essential part of home maintenance. With just a few supplies and steps, your washer and dryer can be sparkling clean and ready to use. Regular cleaning and maintenance will help your appliances run more efficiently and last longer.

Double-paned windows are becoming increasingly popular for homeowners, offering thermal insulation and soundproofing. Unfortunately, condensation can develop between the panes, creating an unsightly appearance. How to fix double-paned window condensation requires a few simple steps.

First, locate the source of the condensation. Several possible causes include insufficient window sealing, cold weather, or high humidity. If the condensation is due to poor window sealing, the homeowner should contact a professional to seal the window properly. In cases of cold weather or high humidity, the homeowner can take steps to reduce condensation.

How to fix Double-Paned Window Condensation

How to fix Double-Paned Window Condensation

If the condensation is due to cold weather, the homeowner should ensure that no drafts are coming in from outside. This can be done by installing weather stripping and closing curtains and blinds to prevent cold air from entering the home. Additionally, the homeowner can use a dehumidifier to reduce the amount of moisture in the air.

In cases of high humidity, the homeowner should consult with a professional about installing a ventilation system. A ventilation system will help to remove excess moisture from the air, thereby reducing condensation in the window. Additionally, the homeowner should open curtains and blinds, allowing air circulation.

Finally, the homeowner should upgrade the window to a more efficient double-paned design. This will help to improve the thermal insulation, reduce noise, and reduce condensation. Newer models of window panes are designed to be more airtight and have better insulation.

These steps can help to reduce condensation in double-paned windows and give the homeowner a more visually appealing window. While condensation can be a problem, taking the proper steps can help to reduce or even eliminate it.

Waterproofing the basement is essential for any homeowner, as it helps prevent flooding, mold growth, and structural damage. A basic waterproofing system typically consists of several components, including a drainage system, sump pump, and interior or exterior waterproofing membranes.

The first step to waterproofing the basement is to create a drainage system. This system will collect water from outside the home and channel it away from the foundation, preventing it from seeping in and causing damage. Installing a perimeter and French drain can help direct water away from home.

Basement Waterproofing

Basement Waterproofing

The second step is to install a sump pump. A sump pump collects groundwater in a sump basin, then pumps it out of the basement and away from home. This helps to prevent groundwater from pooling around the foundation, which can lead to the foundation cracking or shifting.

Finally, homeowners can apply interior or exterior waterproofing membranes to the basement walls. Internal membranes are applied directly to the basement walls and act as a barrier between the dampness of the basement and the living area. Exterior membranes are used outside the foundation and act as a barrier between the foundation and the surrounding soil.

By taking steps such as creating a drainage system, installing a sump pump, and applying interior or exterior waterproofing membranes, a homeowner can effectively waterproof their basement and protect it from flooding, mold growth, and structural damage. Taking the time to waterproof a basement can save a homeowner thousands of dollars in the long run, making it an essential step for any homeowner.